Simple DNS
Okay, so much for anarchy and populism. In a real-world Internet, we can’t trust people to come up with their own names. Avahi is a cool solution, but it doesn’t scale into a huge, international network in which people don’t trust each other. Because of these reasons:
- Scaling: you can't get a broadcast on your network every time someone wants to know your name
- Availability: there would be no central authority governing who owns which name, so people would have to fight over names
So rather than life being “nasty, brutish, and having the inability to know people’s names,” (to paraphrase Hobbes), we need to appoint a sheriff over this internetwork to manage names for us. Enter: DNS.
Goal: A Single Authoritative Name Server
For this chapter, we want to build a single server that is responsible for knowing the IP address for any hostname on our internet. This is known as an "authoritative server". When each machine is added to the internet, it will need its hostname and IP address registered with the authoritative server. Then, when any machine wants to send packets to another machine, it will perform name resolution by querying the authoritative server to learn the IP address of the destination machine.
Let's look at the internet we'll be working with for this chapter:
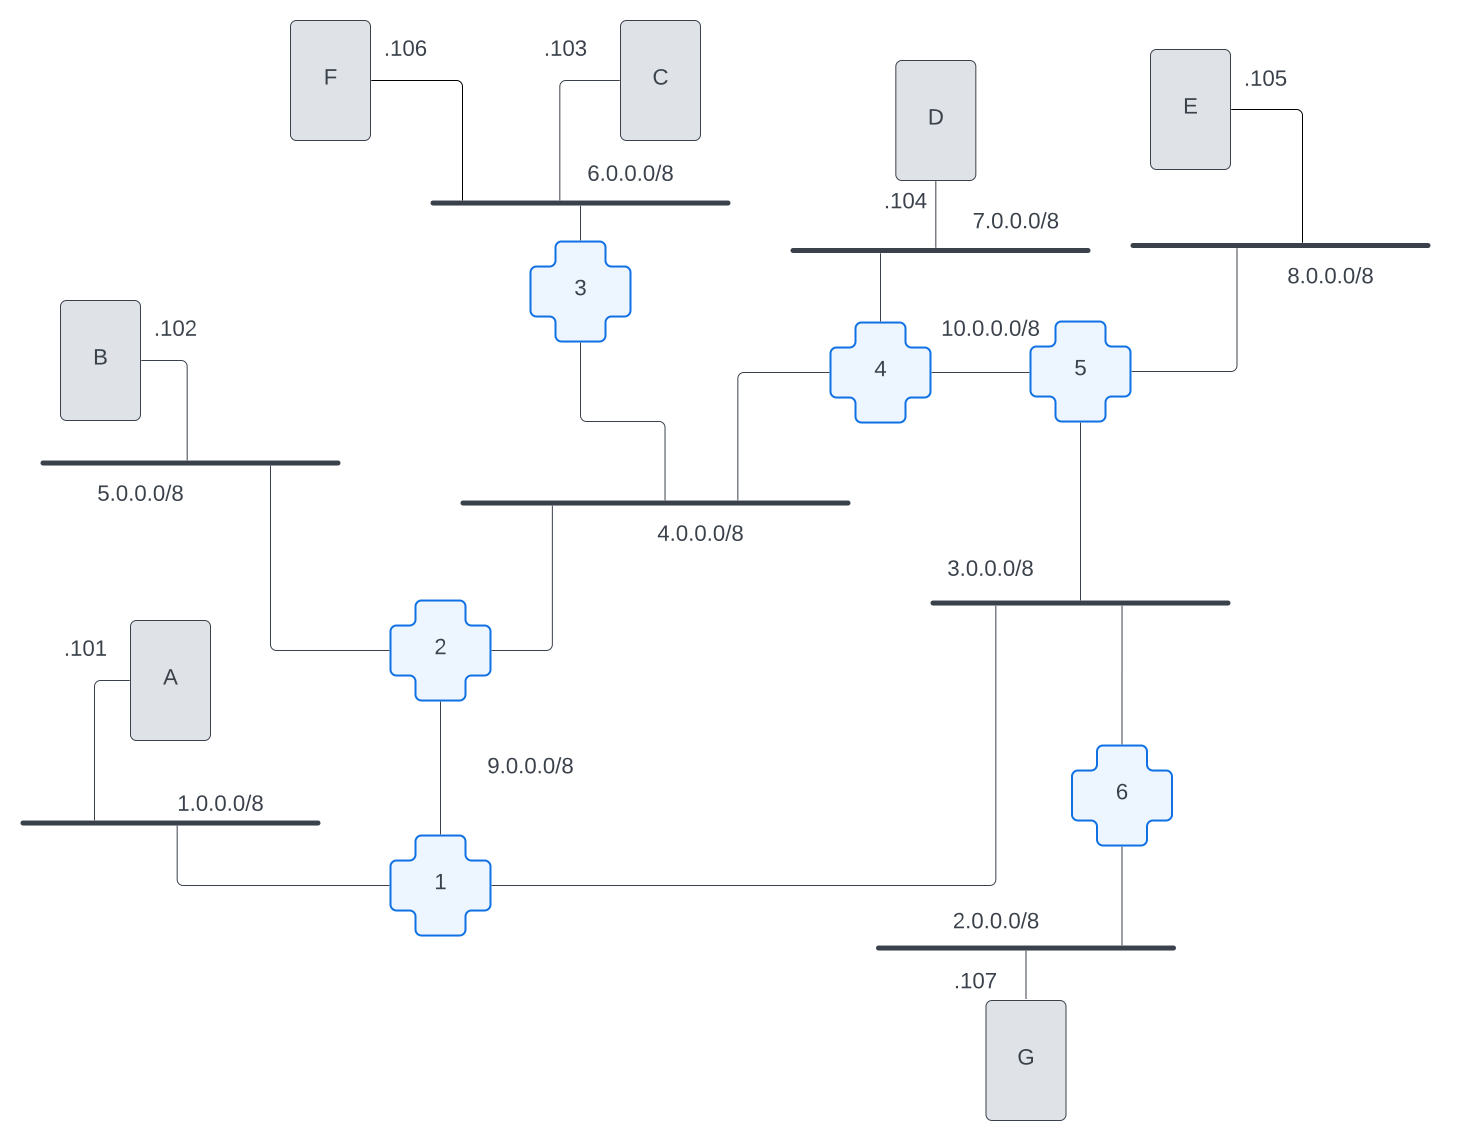
Notice that our internet now has a server called DNS at 2.0.0.107. This server provides Authoritative DNS services for our internet. If you check the directory for this chapter, you'll see that there's a new Dockerfile entry: Dockerfile_dns. This Dockerfile builds its image from a base image that includes DNS server software called knot. To achieve our goal for this chapter, we will need to:
- Configure
knoton our DNS server to answer DNS queries - Create a database of names to IP addresses that
knotcan use to answer DNS queries - Configure each host and router on our internet to point to our DNS server for DNS queries
Prequel
What is DNS?
We've used this term DNS several times now. What are we talking about when we mention DNS???
DNS, or domain name system, is the name resolution process that scales to the size of The Internet™. Just like with everything else we've explored, there are many ways to implement DNS. The simplest solution is to have a single DNS server which manages name resolution for the entire internet. Obviously, that wouldn't scale, but that's a topic for another chapter.
Because this is an open standard, there are a lot of choices for which software you can use to implement your DNS server. We decided to use software called knot.
What is knot? Why are we using knot?
From the Knot DNS website:
Knot DNS is a high-performance authoritative-only DNS server which supports all key features of the modern domain name system.
So why did we choose to go with Knot for our DNS server? Well, there are several reasons:
- It's a very commonly used server
- The people on this team are already familiar with this software
- It's free and open source
- It's high performance/internet scale
If you wanted to look at possible alternatives to implement on your own, here are some of the most commonly used DNS server software on the internet:
Let's configure some Knot
As we mentioned at the start of the chapter, we designated one of the machines on the internet to be our authoritative DNS server. That machine was built with a different docker image that included the Knot DNS software. While that software was installed and is ready to be used, we still need to do some configuration in order for it to serve our little internet.
Go ahead and byoi-rebuild to get this chapter's internet up and running. Then, hopon host-dns and we'll start working on the configuration files.
Knot needs 2 files in order to know how to answer our DNS queries. The first is a knot.conf file. When Knot was installed, it came with a file in the config directory, knot.sample.conf. We can reference this file to build out our own knot.conf file. We're going to stick pretty close to Knot's example simple configuration for our super simple installation. For our needs, we're only interested in the server and zone sections that you can see in the sample file:
server:
    rundir: "/rundir"
    user: knot:knot
    automatic-acl: on
#    listen: [ 127.0.0.1@53, ::1@53 ]
zone:
# # Primary zone
# - domain: example.com
# notify: secondary
# # Secondary zone
# - domain: example.net
# master: primaryAs you saw, there's a listen line (known in Knot as a statement) in the server section that allows you to specify an IP address. This configures Knot to answer DNS queries that come in on that IP address or subnet.
What's that @53 at the end of the IP address??? Port 53 is the internet standard port for handling DNS queries. So,that listen statement, were it uncommented, would tell Knot to listen on 127.0.0.1 on TCP and UDP port 53!
Next up, we need to tell Knot where to find the names it will answer DNS queries for. We can do this by pointing Knot to any zonefiles in the zone section.
So, what's a zone? The short answer is zones are a way to delegate responsibility for hostnames around the internet. We can think of a zone as any domain and its subdomains, e.g. example.com, www.example.com, api.example.com. The organization who owns example.com needs to be able to insert and update DNS records for any of the domains that exist in that zone. We'll be looking at zones in more detail in the next chapter when we look at internet-scale DNS.
The zone we'll create for this chapter is going to cover byoi.net. We'll add some IP addresses, a.k.a. "A Records", for the hostnames that exist on our little internet with the byoi.net suffix, e.g. host-a.byoi.net.
So let's go ahead and get our small internet Knot set up. We'll need to start by creating a new Knot config file and we'll add the server and zone configurations to it.
Start by creating and editing /config/knot.conf:
nano /config/knot.confInside that file add the following:
# Define the server options
server:
  # Listen on all interfaces
  listen: 2.0.0.107@53

# Define the zone
zone:
  - domain: byoi.net
    file: "/etc/knot/byoi.net.zone"
    storage: "/var/lib/knot"
If you check the server section, we're going to have Knot listen on the IP address that we've defined for host-dns on our little internet (2.0.0.107).
As you can see, in the zone definition, we've referenced a zonefile, /etc/knot/byoi.net.zone. But that file doesn't exist yet! We need to make a file that defines the byoi.net zone!
Save and exit the config file.
Next up, make the directory that the file will live in, and then make and start editing the file itself:
mkdir /etc/knot
nano /etc/knot/byoi.net.zone
And inside that file, add this zone definition:
@       IN SOA (
                host-dns.byoi.net.  ; MNAME
                admin.byoi.net.     ; RNAME
                2024041501          ; serial
                3600                ; refresh (1 hour)
                900                 ; retry (15 minutes)
                604800              ; expire (1 week)
                86400               ; minimum (1 day)
                )

host-a     IN A    1.0.0.101
host-b     IN A    5.0.0.102
host-c     IN A    6.0.0.103
host-d     IN A    7.0.0.104
host-e     IN A    8.0.0.105
host-f     IN A    6.0.0.106
host-h     IN A    4.0.0.108

host-dns   IN A    2.0.0.107
This file is called a zonefile. A zonefile defines all the DNS responses for a given zone, e.g. all the subdomains of byoi.net. In this file, we just added the IP address for each host on our internet.
But what's that big block at the top? SOA, or Start Of Authority, is a DNS record that provides zone configuration and other information. The details of this block aren't necessary to go into for our minimal DNS configuration for this chapter. We'll need to look at a few of these values next chapter. If you're gunning to learn more before then, checkout this awesome document.
Get Knot running
Now it's time to get our Knot server up and running! Still on the host-dns machine, start the knot daemon:
/usr/sbin/knotd --config /config/knot.confThis will run Knot in the "foreground." Meaning, if you CTRL + C out of that, the server stops running. The benefit of running it this way is that you get to see all the logs of what happens during startup. This is especially useful if you want to catch a configuration mistake, because knot will report any errors directly to the screen. If do you see an error, you can CTRL + C out of the server, fix the problem, and try again. Also, if you do get an error, knot might just stop and protest that you need to fix the error before it will run.
Once you've confirmed that it's working properly, you can either leave Knot running in the foreground and open a new terminal session to continue working, or you can daemonize the Knot server by restarting it and adding the --daemonize flag:
/usr/sbin/knotd --config /config/knot.conf --daemonizeSweet, now that we have told knot to start up with the configuration in place, let's make sure that it is indeed listening for DNS queries. We can do that with the help of netstat command. In your host-dns container, run the following:
root@host-dns:/# netstat -lnp
Active Internet connections (only servers)
Proto Recv-Q Send-Q Local Address           Foreign Address         State       PID/Program name
tcp        0      0 2.0.0.107:53            0.0.0.0:*               LISTEN      21/knotd
tcp        0      0 127.0.0.11:33947        0.0.0.0:*               LISTEN      -
udp        0      0 127.0.0.11:56006        0.0.0.0:*                           -
udp        0      0 2.0.0.107:53            0.0.0.0:*                           21/knotd
udp        0      0 2.0.0.107:53            0.0.0.0:*                           21/knotd
udp        0      0 2.0.0.107:53            0.0.0.0:*                           21/knotd
udp        0      0 2.0.0.107:53            0.0.0.0:*                           21/knotd
udp        0      0 2.0.0.107:53            0.0.0.0:*                           21/knotd
udp        0      0 2.0.0.107:53            0.0.0.0:*                           21/knotd
Active UNIX domain sockets (only servers)
Proto RefCnt Flags       Type       State         I-Node   PID/Program name     Path
unix  2      [ ACC ]     STREAM     LISTENING     129228   21/knotd             /rundir/knot.sock
Here's what this is telling us overall, what software is listening for what types of network connections. Like many of these programs, this tells us all kinds of stuff, only some of which we care about right now. Let's highlight the things that are important to us for this chapter:
- Proto. This indicates tcp or udp.
- Local Address: You'll see an IP address followed by a port (
:and a number).- IP address: This is address that the software that is listening is listening on. This will typically be the one and only external IP address that the machine has (in our case,
2.0.0.107). However, you may also see an IP address that starts with127. In that case, the machine is only listening for connections from sources that are internal to the machine and isn't listening for connections from the overall network. - Port: You see port
53for bothTCPandUDPprotocols. As you may recall from other chapters, port53is the standard port used forDNSrequests.
- IP address: This is address that the software that is listening is listening on. This will typically be the one and only external IP address that the machine has (in our case,
- PID/Program name: mostly what we see here is
21/knotd(NOTE: This might be a different number on your host-dns machine, that's okay). This means that the program that is listening on this network port is "knotd" (which stands for knot daemon), and it's process-id is21. The process ID is useful if you ever want to stop and restart the daemon (by running thekill <process-id>command).
You might be wondering why we have udp 0 0 2.0.0.107:53 0.0.0.0:* 21/knotd represented not just once but 6 (SIX) times! We wondered the same thing! This is why we are best friends! Turns out, knot is "multi-threaded," which means each one of those 6 (SIX) lines in the output points to a different running instance of the software that can handle any incoming DNS requests simultaneously.
We are almost there! Before we can issue a dig command to see the DNS request working, we have one more thing to take care of.
Update your host-dns resolv.conf file
The configuration we have done so far is to get knot running. Now, we need to configure host-dns to know how to resolve names.
So now, in order to use the Knot server's information about the names on our internet, we need to tell the host-dns machine to use itself to resolve hostnames. This pattern should be familiar since we had to configure either /etc/hosts or /etc/nsswitch.conf for similar ends in our earlier exploration of name resolution.
We talked in chapter 1 of this section about how a machine knows who to ask to resolve a name. Take a moment and have a look at the /etc/resolv.conf file on the host-dns machine:
nano /etc/resolv.confYou'll see the contents of this file as follows:
nameserver 127.0.0.11
options edns0 trust-ad ndots:0
This configuration file is generated for you by Docker, because it's trying to be "helpful." The IP address for the nameserver (127.0.0.11) is the one that Docker set up for you to provide name-services for all your docker containers. This IP address may look familiar to you from the netstat output we just looked at. IT WAS DOCKER THE WHOLE TIME.
But we don't want Docker's nonsense because we're doing this ourselves. 💪🏼💪🏼💪🏼
Let's edit that IP address, changing it from 127.0.0.11 to 2.0.0.107. This will tell your host-dns machine to start using the Knot server that you just configured instead of Docker's weird DNS stuff.
See it working
Sweet! We got our Knot DNS daemon up and running. AND we are using that daemon on the host-dns machine to answer name-resolution queries for us. Let's test it by running a dig command and see what we get back:
root@host-dns:/# dig host-a.byoi.net

; <<>> DiG 9.18.24-1-Debian <<>> host-a.byoi.net
;; global options: +cmd
;; Got answer:
;; ->>HEADER<<- opcode: QUERY, status: NOERROR, id: 22124
;; flags: qr aa rd; QUERY: 1, ANSWER: 1, AUTHORITY: 0, ADDITIONAL: 1
;; WARNING: recursion requested but not available

;; OPT PSEUDOSECTION:
; EDNS: version: 0, flags:; udp: 1232
;; QUESTION SECTION:
;host-a.byoi.net.  IN A

;; ANSWER SECTION:
host-a.byoi.net. 3600 IN A 1.0.0.101

;; Query time: 0 msec
;; SERVER: 2.0.0.107#53(2.0.0.107) (UDP)
;; WHEN: Wed May 08 18:59:48 UTC 2024
;; MSG SIZE  rcvd: 60
Ok, there's a lot of information in that dig output. First, let's acknowledge that the dig output is a bit of a mystery wrapped in an enigma. Why are there ;s at the beginning of every line? Who knows? Who cares?
But... this is the most commonly used tool for diagnosing DNS configurations. So, we're gonna use it. Let's take second to understand the basics of it. We'll pull out some particularly useful things to note.
;; ->>HEADER<<- opcode: QUERY, status: NOERROR, id: 22124
First, HEADER. Any time you see header, you're looking at metadata. This section is just giving us some high level information about the response that we're going to be looking at.
The most important bit is status. The status header tells us whether or not a request was able to return a response at all, and in cases where it couldn’t, why it couldn’t return a response. The most common statuses are:
NOERROR: The request for a domain was successfully routed. Nothing went wrong. Everything is fine. You're cool.SERVFAIL: The domain requested exists, but the DNS server either doesn’t have data or has bad data for it.NXDOMAIN: The domain requested doesn’t exist. TheNXhere stands forNon-eXistent.REFUSED: The authoritative DNS server refused the request. The domain doesn’t exist and the server refuses to process requests for domains that do not exist.
;; QUESTION SECTION: ;host-a.byoi.net. IN A
This is the question you sent to to your resolver. A resolver is a piece of software that performs DNS lookups. We'll discuss more about the different types of resolvers in the next chapter. In this case, the QUESTION is asking the resolver to return the A record for the indicated hostname.
What is an A record, you ask? Excellent question. The A in A record stands for address. An A record is just DNS shorthand for an IPv4 address, so an address that looks like 127.0.0.1. There are a plethora of DNS record types if you want to look up more of them!
dig, by default, sends a query for an A record. Our QUESTION SECTION shows us that we were sending a request for name-resolution for host-a.byoi.net.
;; ANSWER SECTION: host-a.byoi.net. 3600 IN A 1.0.0.101
Here's where knot's magic happens! Knot looks at the name we requested (host-a.byoi.net), pulls off the "zone" information (byoi.net) and sees if it has any information for that zone. Since we configured a byoi.net zone for knot, it knows where to look!
So knot goes and looks at the /etc/knot/byoi.net.zone zonefile and finds host-a. It then returns the IP address associated with that entry (1.0.0.101).
What happens if you send a query for a domain that isn't defined in that file? Try it and find out. Can you decipher the output? HINT: the status in the HEADER will give you a lot of context! Take a look at the output for the following queries.
dig host-x.byoi.net(a name that could ostensibly be in thebyoi.netzone)dig host-a.foo.net(a name that our Knot instance knows nothing about)
;; SERVER: 2.0.0.107#53(2.0.0.107) (UDP)
This line tells us the IP address (2.0.0.107), port (53), and protocol (UDP) for the resolver that answered our DNS query. Let's start with the IP address: 2.0.0.107. What's this address? Why was this used?
Get names resolving around the internet
Cool, good job — you got one server to answer questions about names on our internet. It ain't worth much until it's usable throughout the network! Let's now configure all the rest of the hosts in our internet to use the host-dns for name resolution.
Configure host-a to get name-resolution working
What do you think the next steps are for getting this to work across this inter-network? How would you, for example, configure host-a to use the host-dns server to resolve names? What file would you change on host-a to get it to use 2.0.0.107 as the name server?
In other words, when you run a dig from host-a, to try to get the IP address of host-b.byoi.net, you're going to get a failure.
Basically, dig on host-a doesn't yet know that it needs to use the host-dns server for name requests. You could tell dig what server to use with the @ parameter (e.g. dig host-b.byoi.net @2.0.0.107). This will tell dig that you want to use the host-dns server for name resolution.
But, that only works for dig. Commands like ping or links will not get the joke and will still fail to resolve names into IP addresses.
We're going to leave it as an exercise for you to configure host-a (and then, each one of the hosts on this network) to resolve names across the board.
HINT Go look at the host configuration section above for details on this.
As always, the working solution for having names resolving with DNS for the entire internet is store in the final directory. If you are confused about how to configure anything, you can always look there
By the time you're done, you should be able to do the following:
- on
host-a, you should be able to run the commandping host-d.byoi.net -w 2and you should be able to get responses. - you should be able to
hopon host-d(for example) and runlinks http://host-c.byoi.netand bring up the web page on that host.