Automatic route configuration
Up to this point, we have been manually configuring how our routers are able to find machines on our toy internet. As you can imagine, as the internet grows, this becomes quite the cumbersome process! If you look at something at the scale of The Real Internet™, it quickly becomes obvious that it's not possible to manually configure routes for all the machines on the entire Internet.
Describing the problem
We are trying to solve a complex problem in this chapter.
We have a bunch of computers that are on an internet. Every computer needs to be able to send messages to (potentially) every other computer on our internet. In previous chapters, we explored how these special computers called "routers" have interfaces on multiple networks which allow them to pass packets from computers on one network to computers on another network. We manually told each and every one of these routers what the best path is to be able to reach computers on every network.
Okay, so if we're not going to go around manually configuring the entire set of routers on the internet, where do we start? Well, we know that each router already knows what networks it has an interface on. Those will be the first entries on its routing table. The router also knows whether or not each interface is "up" or "down" (i.e. if it can send and receive packets on that interface).
So, if each router already has intrinsic information about networks its connected to, the next thing we need is a method to communicate this information to each other router. This communication is called a "routing protocol." There is more than one routing protocol, so let's start by examining the simplest of all the routing protocols: "RIP" (which stands for "Routing Information Protocol").
⚠️ DISCLAIMER:RIP is not widely used by network professionals in the world today because it has lots of problems that were discovered over time when people started building massively huge networks with security concerns. But for our purposes, its simplicity will help us understand what a routing protocol does without getting mired in the complexity of more advanced routing protocols.
Let's take a look at how RIP works, step-by-step. We'll start with a simple four-router network where each one is configured in a ring. Let's see how each router will learn about networks that it is not connected to.
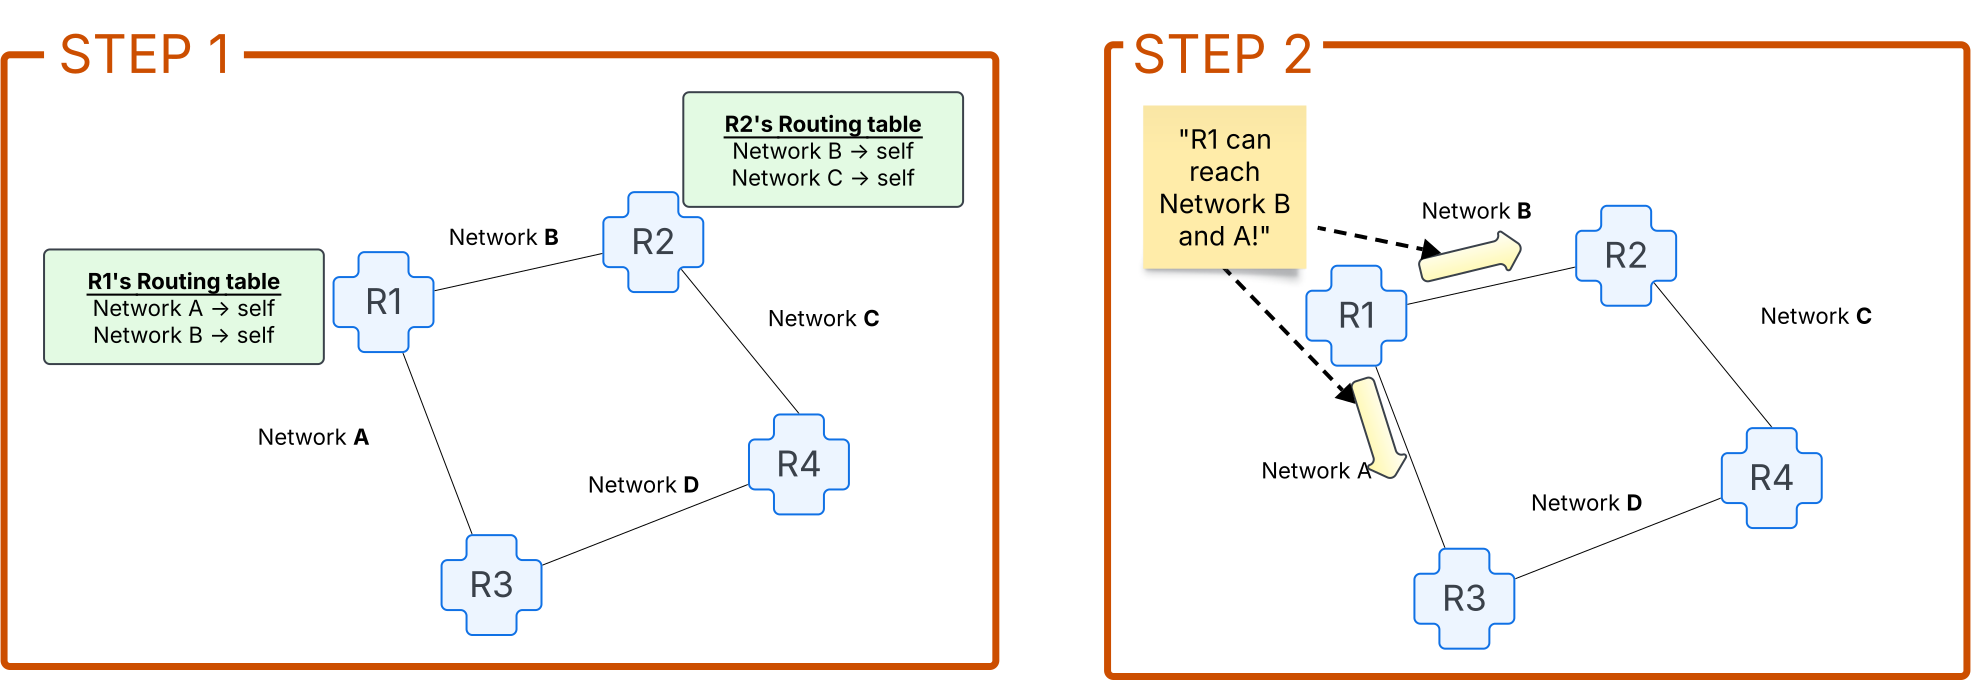
Step 1 Remember, each router starts with only the information it knows about through its physical interfaces. Therefore the routing table for each router is initially populated only with the networks it has physical interfaces on.
Because routing information needs to be disseminated throughout the internet between routers that are directly connected to each other, we're going to put special emphasis on pairs of routers that have this direct-connection. Routers that can talk directly to each other over a single network are called neighbors. The RIP protocol will have each router communicate all information in its own routing table to each of its neighbors as seen in the steps that follow.
Step 2 router R1 sends messages to its neighbors (routers R2 and R3) that say this: "Hey! If you have a packet destined for either network A or network B, you can send those packets to me! I'll make sure to get those packets to their final destination. If you have a better way to get to those networks, that's fine — but I'm here if you need me."
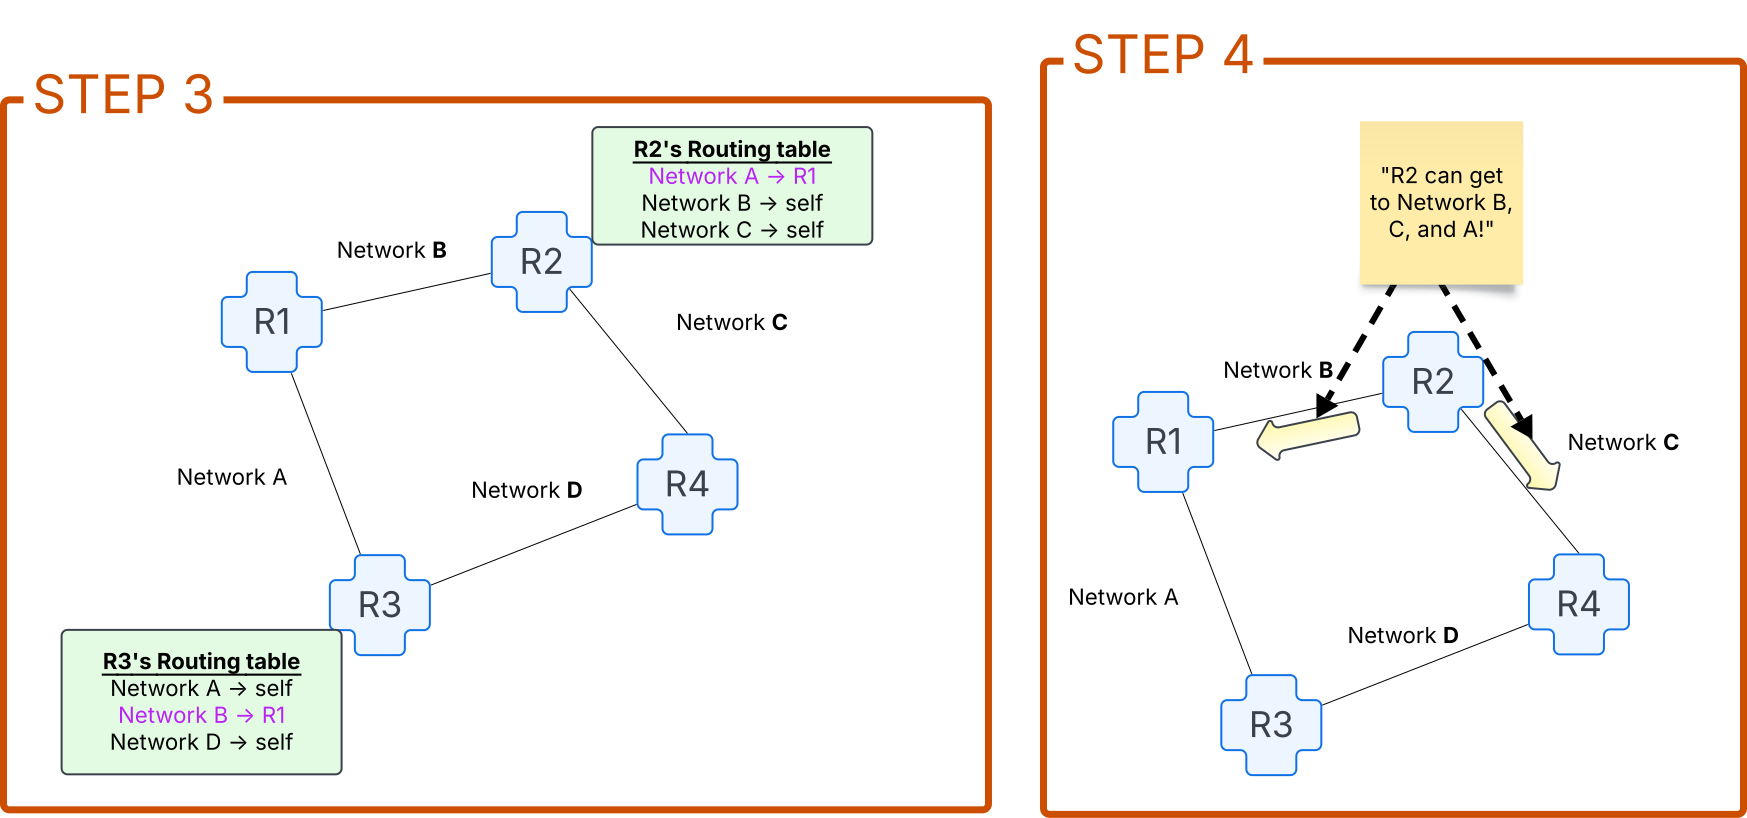
Step 3 Router R2 has received the message from router R1 and says, "Oh, snap! I've never heard of Network A before! I'm glad to know that router R1 has got me covered if I have packets that needs to go there. I better update my routing table with this new information (highlighted in pink in the diagram). However, I already knew about network B because I have an interface on it, so I'm gonna ignore that part of the message."
Similarly, router R3 already knew about network A but adds the new information that network B can be reached through router R1.
Step 4 Router R2 also wants to contribute to the Internet's understanding of routing, so it will continue with the same pattern. But it now has some second-hand information (namely that it can reach network A through router R1). And it's going to send out its messages that say, "Hey, y'all, this is router R2, and guess what, I can reach networks A, B, and C. If you need to send a packet to one of those networks, I gotchu bro!"
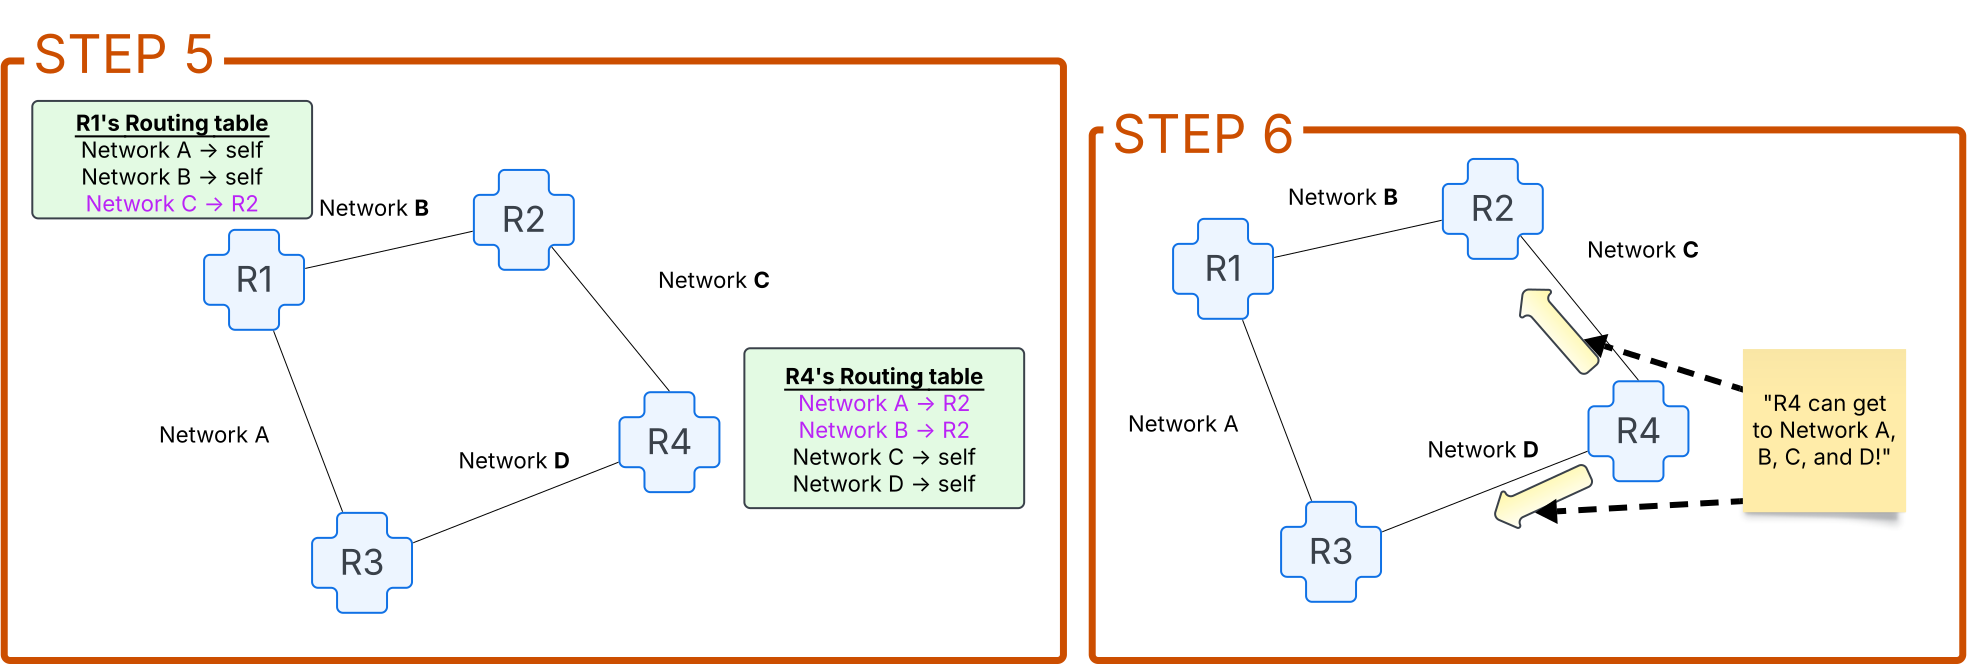
Step 5 Router R4 learns about two new networks (A and B) and updates its routing table to send all packets destined for networks A and B to router R2. Similarly, Router R1 learned about network C and updates its own routing table accordingly.
Step 6 Router R4 now communicates out ITS routing table (which includes information about networks A, B, C, and D) out to all of ITS neighbors (R2 and R3).
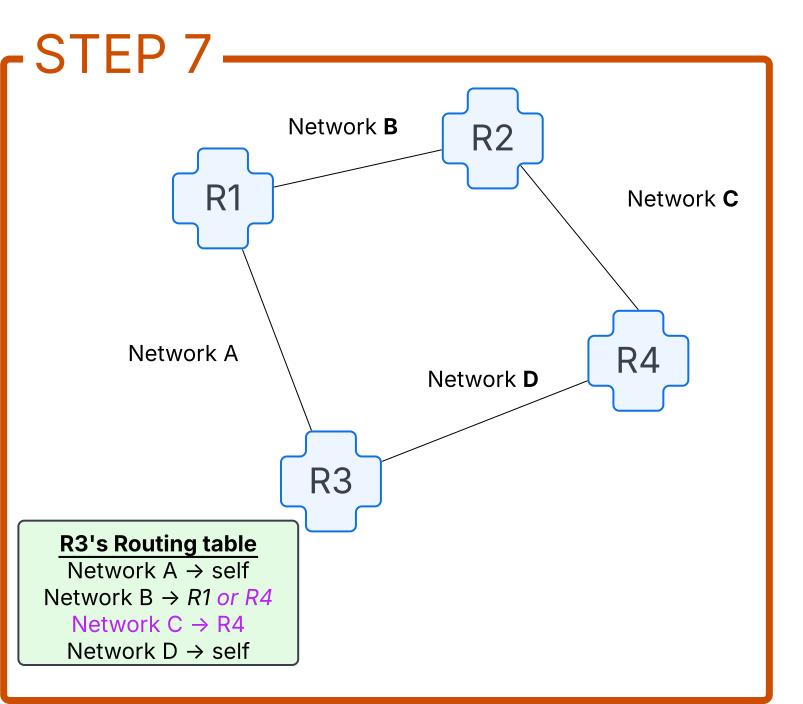
Step 7 So router R3 receives this communication from router R4 and says to itself, "Sweet! Let me check my routing table for what needs to be updated! Oh, snap! I already have an entry for network B! Should I continue to send packets to router R1, or should I update my routing table to send packets to router R4 instead? I'm so confused! (⊙.☉)7"
🤔 Stop and Think! Knowing what you know about the network (since you have a bird's eye view of what's going on), what do you think the right answer is to this question? If router
R3sent packets destined for networkBto routerR4, would it get there faster or slower than sending them to routerR1? Trace the diagram path it would take through each choice. All things being equal, having fewer routers involved in getting the packet to its destination is preferable.
Okay, so router R3 should prefer using router R1 for network B, but how does it know which is the better path?
To solve this problem, we're going to introduce a new wrinkle in how routers advertise their routes to each other. In our previous diagrams, our routers were only advertising the fact that they could reach particular networks. Now we're going to add additional metadata to this advertisement. When the routers are communicating their routing tables out, they'll also include a count of how many routers a packet would have to pass through to reach the destination network. This is called the "hop count." Therefore, since we have decided that a smaller hop-count is preferable, if a router has two choices for how to get to a given destination network, it will pick the one with the smallest hop-count.
So now let's now go back to step 6. Here is a new diagram which adds hop-count information to the routes that R4 is advertising.
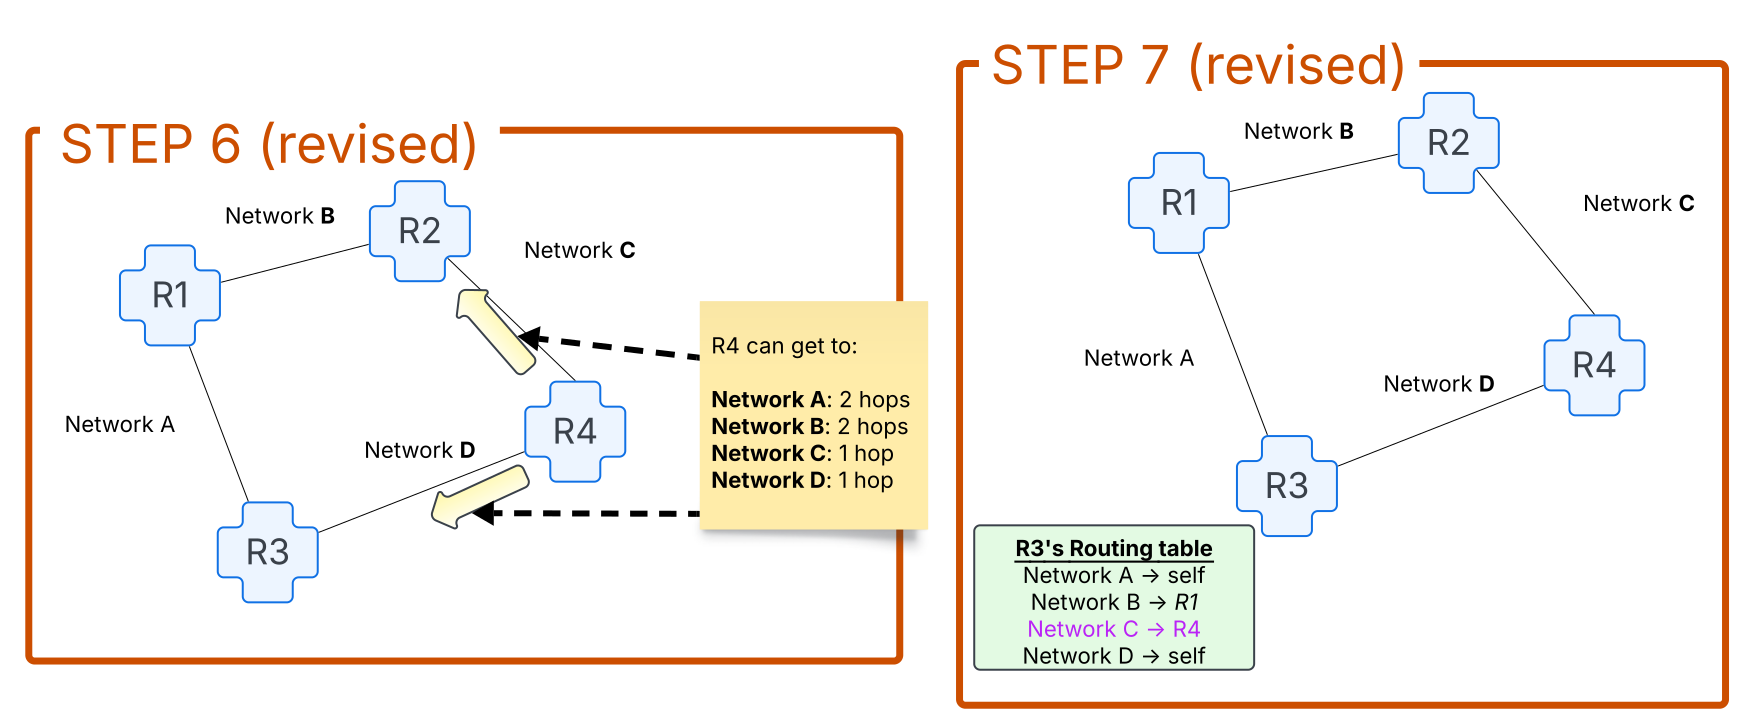
Therefore, when router R3 receives the new advertisement for network B, it compares the advertisement it got from router R1 with a hop-count of 1 to the advertisement it got from router R4 with a hop-count of 2. Since the hop-count from router R1 is smaller, it keeps that route in its routing table and ignores the one from router R4.
🤔 PUZZLER: is hop-count necessarily always the best metric for deciding if a path is preferable? What other properties of the network might be taken into account to make these kinds of choices? Since RIP only takes hop-count into account for preferability, this might be one of the reasons it's no longer used.
Now that we understand how RIP works, let's talk about the software that we can use to implement RIP on each of our routers: BIRD!
Introducing the BIRD (BIRD Internet Routing Daemon) project
BIRD is a software that routers can run that gives them access to a number of different routing protocols (RIP included!). BIRD is a modular system that allows you, as a network administrator, to decide:
- where routing information should come from
- what we should do with that information
BIRD does this through a config file that we're going to explore as we look at setting up BIRD on our internet. We're going to jump straight into running RIP in BIRD. If you're curious about learning more in depth about how BIRD works, refer to the appendix.
Implementing RIP in BIRD
If you haven't yet already done a byoi-rebuild, for this chapter, do so now.
Before we look at BIRD itself, let's first take a look at the routes that router-a2 already has in its routing table. Start by taking a look at the network map:
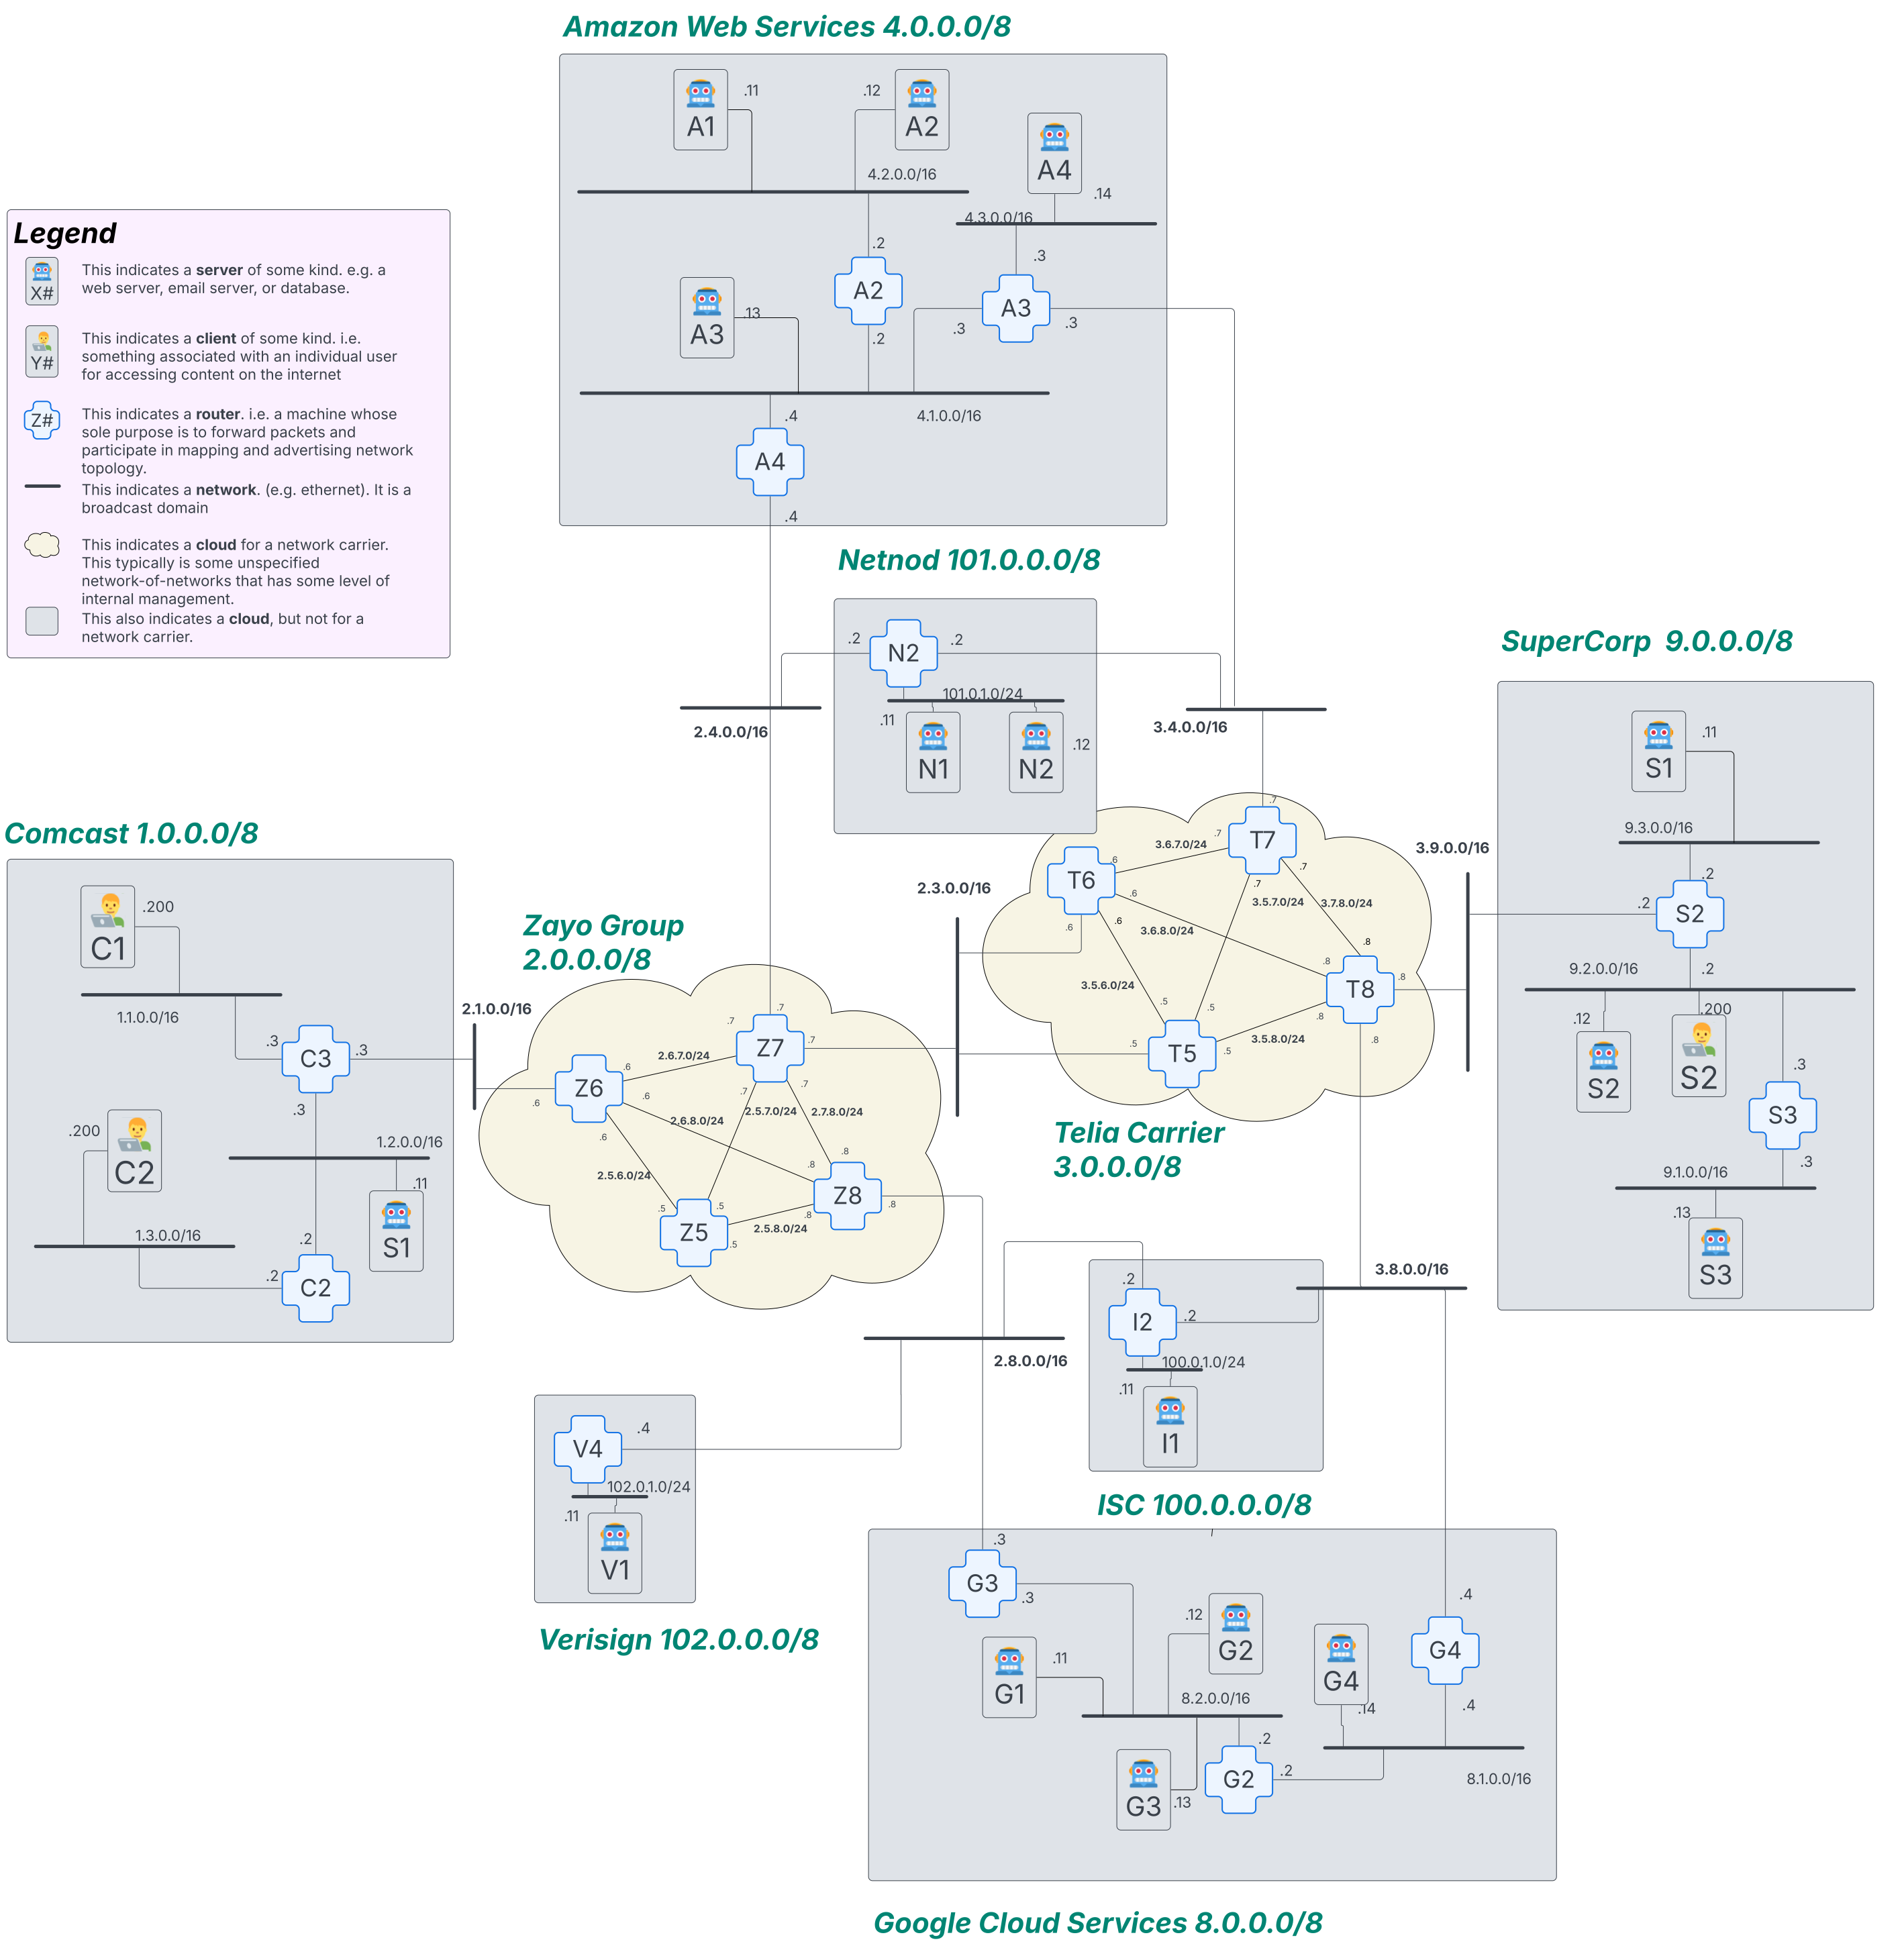
router-a2 only has interfaces on 4.1.0.0/24 and 4.2.0.0/24. Now, let's go onto the router and check the routes. hopon router-a2 and use our old friend, ip route. You should see that it only has routes for those interfaces:
root@router-a2:/# ip route
4.1.0.0/16 dev eth0 proto kernel scope link src 4.1.0.2
4.2.0.0/16 dev eth1 proto kernel scope link src 4.2.0.2
📝 NOTE: your interface names (eth0 and eth1) may be different.
Our next step is to configure the BIRD software to allow this router to learn routes from its neighbors and to spread the knowledge of its own routes far and wide across the internet.
We've already added the BIRD software to each of our routers in this chapter. Now we need to configure BIRD so it knows what routes to share with other routers as well as how to share those routes.
A working configuration for implementing RIP in BIRD is given below. We'll implement this configuration on router-a2 first and then we'll move router-by-router and see how routing-tables are populated and look at some key controls that BIRD provides for us to check on the status of our RIP environment.
Configure the first router
The first step in configuring BIRD is to update the /etc/bird/bird.conf file. Here is the command that will update the configuration file and tell BIRD to talk RIP to any other routers that are neighbors.
cat > /etc/bird/bird.conf << EOF

debug protocols all;
protocol device {
  scan time 10;
}
protocol direct {
  interface "*";
}
protocol kernel {
  import none;
  export all;
}
protocol rip {
  import all;
  export all;
  interface "*" {
    version 2;
  };
}

EOF
Copy this entire block and paste it into the terminal session for router-a2 and press ENTER.
📝 NOTE: This codeblock represents a quick-and-easy way to create a file by pasting it into the terminal. It's called a here doc.
This configuration file is a lot to look at in one go! Let's not spend a lot of time right now going over this line-by-line. Instead, we'll focus on understanding routing protocols as a general concept. BIRD's specific implementation is just one way of doing this and spending too much energy on the BIRD software may not be our most fruitful endeavor.
If you can't really stand to continue without digging in deeply to how things work, check out these resources:
However, neither of these are necessary to understand RIP. We encourage you come back and look at this content after you've finished this chapter.
In the name of continuity, let's continue using BIRD to play around with RIP!
Start the BIRD daemon in interactive debugging mode with the new config
Let's run BIRD with this new configuration in interactive debugging mode by giving it the -d flag when we start it:
root@router-a2:/# bird -d
bird: device1: Initializing
bird: direct1: Initializing
bird: kernel1: Initializing
bird: rip1: Initializing
bird: device1: Starting
bird: device1: Scanning interfaces
bird: device1: Connected to table master
bird: device1: State changed to feed
bird: Chosen router ID 4.1.0.2 according to interface eth0
...
Don't panic! You're going to see a lot of debugging information here. Scan through this output and see what you can understand. It's okay if it doesn't all (or even mostly!) make sense to you. Find the bits that do make sense and see if you can understand them in context. Once the BIRD has completed its initialization, you should see the following lines continuing to output:
bird: device1: Scanning interfaces
bird: kernel1: Scanning routing table
bird: kernel1: Pruning table master
bird: rip1: Interface timer fired for eth1
bird: rip1: Sending regular updates for eth1
bird: rip1: Sending response via eth1
bird: device1: Scanning interfaces
bird: kernel1: Scanning routing table
bird: kernel1: Pruning table master
This is telling us that BIRD is scanning to see what routes it could be learning. SO, let's go take a look at those routes!
Check your routes on router-a2
Leave the bird -d output scrolling in this window, and open a new window and hopon router-a2 once again so we can watch the route table update as we add new neighbors.
Let's take a look at how router-a2's routing table has changed! We're going to use the watch command with the ip route command so that we can see the routes refresh in real time as we make changes:
root@router-a2:/# watch ip routeEvery 2.0s: ip route router-a2: Wed Apr 16 20:23:21 2025
4.1.0.0/16 dev eth0 proto kernel scope link src 4.1.0.2
4.2.0.0/16 dev eth1 proto kernel scope link src 4.2.0.2This is going to display an updated list of routes this machine knows about every two seconds.
You might feel a slight sense of disappointment that you don't see any new routes yet. Why did we do all that work with BIRD just to have the router do nothing?! Well, with only one router running RIP, there is nothing for it to communicate with and so no new route information is coming into this router. This is like one hand clapping: no sound yet!
Add a neighbor
In order to see some interesting results, we need to have at least two routers that neighbor each other running RIP. So let's configure router-a3 the same way and watch the routes roll in!
Open a third window, this time to router-a3, and paste the same here-doc command that we gave you for router-a2. After you've run that command, the /etc/bird/bird.conf file on router-a3 will match the configuration that we gave you for router-a2. All of these routers will take exactly the same configuration file. Easy, huh?
Run BIRD on router-a3 with the debugging switch. You should see something like this:
root@router-a3:/# bird -d
bird: device1: Initializing
bird: direct1: Initializing
bird: kernel1: Initializing
bird: rip1: Initializing
bird: device1: Starting
bird: device1: Scanning interfaces
bird: device1: Connected to table master
bird: device1: State changed to feed
bird: Chosen router ID 3.4.0.3 according to interface eth2
In your window on router-a2 that is running watch ip route, you should suddenly see some new routes show up!
Every 2.0s: ip route       router-a2: Wed Apr 16 20:34:35 2025

3.4.0.0/16 via 4.1.0.3 dev eth0 proto bird
4.1.0.0/16 dev eth0 proto kernel scope link src 4.1.0.2
4.2.0.0/16 dev eth1 proto kernel scope link src 4.2.0.2
4.3.0.0/16 via 4.1.0.3 dev eth0 proto bird
Notice the proto bird on the new routes that just showed up. This tells you where they came from! Thanks, BIRD (・‿・)ノ⌒
In the first window, where you have the debugging output from router-a2's BIRD process, you may need to scroll back a little bit, you should also see a whole bunch of fun new RIP debugging messages show up, such as the following:
bird: rip1: Interface timer fired for eth1
bird: rip1: Sending regular updates for eth1
bird: rip1: Sending response via eth1
bird: rip1: New neighbor 4.1.0.3 on eth0
bird: rip1: Request received from 4.1.0.3 on eth0
bird: rip1: Sending response via eth0
bird: rip1: Response received from 4.1.0.3 on eth0
bird: rip1 > added 4.1.0.0/16 via 4.1.0.3 on eth0
bird: rip1 > added [best] 4.3.0.0/16 via 4.1.0.3 on eth0
bird: kernel1 < added 4.3.0.0/16 via 4.1.0.3 on eth0
bird: rip1 < added 4.3.0.0/16 via 4.1.0.3 on eth0
bird: rip1: Scheduling triggered updates for eth0
bird: rip1: Scheduling triggered updates for eth1
bird: rip1 > added [best] 3.4.0.0/16 via 4.1.0.3 on eth0
bird: kernel1 < added 3.4.0.0/16 via 4.1.0.3 on eth0
bird: rip1 < added 3.4.0.0/16 via 4.1.0.3 on eth0
bird: rip1: Interface timer fired for eth1
bird: rip1: Sending triggered updates for eth1
bird: rip1: Sending response via eth1
bird: rip1: Interface timer fired for eth0
bird: rip1: Sending triggered updates for eth0
bird: rip1: Sending response via eth0
bird: device1: Scanning interfaces
bird: kernel1: Scanning routing table
bird: kernel1: 3.4.0.0/16: seen
bird: kernel1: 4.3.0.0/16: seen
This debugging output is a little simpler than the debugging output that we've seen from tcpdump. Take a minute and see if you can make a little sense of what's happening here. Go through the output line-by-line and write down what you think each line might mean.
The gist of this is that we're watching BIRD use the communication happening over the RIP protocol to learn new routes and save them into its local routing table.
Because we'll know if each new router we add is successful by watching the output on router-a2, we don't need to continue watching the debugging on router-a3. We're therefore going to terminate the BIRD program and re-start it in background mode. Type Control + C to stop the running BIRD and re-start it without the -d flag in order to have it run in the background. When you run it this way, you'll see nothing in the terminal output, instead you'll be taken back to the command-line prompt. If you want to confirm that BIRD is running, try using the ps aux command to see your background processes.
Rinse and repeat!
Okay, we've got two routers running RIP and communicating routes successfully to each other. Guess what... we have nineteen more to go!
Here are the rest of the routers that need to be configured:
- router-a4
- router-n2
- router-z7
- router-z6
- router-z8
- router-z5
- router-c3
- router-c2
- router-t7
- router-t6
- router-t8
- router-t5
- router-s2
- router-s3
- router-i2
- router-v4
- router-g3
- router-g4
- router-g2
🤔 Stop and Think! We are only running BIRD on the routers. Would there be a benefit to setting it up on servers and clients? In general, clients and servers live on networks for which there is only one router handling their network traffic. Therefore, instead of running BIRD on these machines, we give each of these systems what is known as a "default route". This just says, "send all packets that are not for my local network to this router!"
It's time to roll out the configuration to each and every one of these little guys! Note that these routers have been given in a specific order. The reason for this has to do with the concept of "neighbors" that we've talked about earlier. Remember that the RIP protocol has to communicate over Ethernet (meaning, on-the-same-network) to other routers. Those routers are "neighbors" because they are adjacent to each other on a larger internet. If we start running RIP on a router that doesn't have direct communication with another router running RIP, then there's no way for the routes to populate. Once we've filled the gap and have a contiguous line of routers running RIP, the routes will populate eventually. But since we'd like to see updates on router-a2 for each and every router that we configure, we want to make sure that we're always configuring a new router that neighbors a router that's already configured.
Here's what you'll need to do for each router in the list:
hopon <router-name>- paste the
/etc/bird/bird.conffile in to match what we gave you forrouter-a2androuter-a3. - start the BIRD process (just run
birdon the command-line without the-dflag) - pay attention to the open windows for
router-a2to see the new routes populate.
Since you're running BIRD in the background (i.e. without the -d flag), you don't need to stay logged in to each router for the BIRD software to continue to do its thing.
Validate that shit!
Spot-check your routes!
By the time you're done with all that serious labor, the output of the watch ip route command on router-a2 should have gotten pretty huge! It should look a lil' somethin' like this:
Every 2.0s: ip route                                                               router-a2: Wed Apr 16 21:02:19 2025

1.1.0.0/16 via 4.1.0.4 dev eth0 proto bird
1.2.0.0/16 via 4.1.0.4 dev eth0 proto bird
1.3.0.0/16 via 4.1.0.4 dev eth0 proto bird
2.1.0.0/16 via 4.1.0.4 dev eth0 proto bird
2.3.0.0/16 via 4.1.0.4 dev eth0 proto bird
2.4.0.0/16 via 4.1.0.4 dev eth0 proto bird
2.5.6.0/24 via 4.1.0.4 dev eth0 proto bird
2.5.7.0/24 via 4.1.0.4 dev eth0 proto bird
2.5.8.0/24 via 4.1.0.4 dev eth0 proto bird
2.6.7.0/24 via 4.1.0.4 dev eth0 proto bird
2.6.8.0/24 via 4.1.0.4 dev eth0 proto bird
2.7.8.0/24 via 4.1.0.4 dev eth0 proto bird
2.8.0.0/16 via 4.1.0.4 dev eth0 proto bird
3.4.0.0/16 via 4.1.0.3 dev eth0 proto bird
3.5.6.0/24 via 4.1.0.3 dev eth0 proto bird
3.5.7.0/24 via 4.1.0.3 dev eth0 proto bird
3.5.8.0/24 via 4.1.0.3 dev eth0 proto bird
3.6.7.0/24 via 4.1.0.3 dev eth0 proto bird
3.6.8.0/24 via 4.1.0.3 dev eth0 proto bird
3.7.8.0/24 via 4.1.0.3 dev eth0 proto bird
3.8.0.0/16 via 4.1.0.3 dev eth0 proto bird
3.9.0.0/16 via 4.1.0.3 dev eth0 proto bird
4.1.0.0/16 dev eth0 proto kernel scope link src 4.1.0.2
4.2.0.0/16 dev eth1 proto kernel scope link src 4.2.0.2
4.3.0.0/16 via 4.1.0.3 dev eth0 proto bird
8.1.0.0/16 via 4.1.0.3 dev eth0 proto bird
8.2.0.0/16 via 4.1.0.4 dev eth0 proto bird
9.1.0.0/16 via 4.1.0.3 dev eth0 proto bird
9.2.0.0/16 via 4.1.0.3 dev eth0 proto bird
9.3.0.0/16 via 4.1.0.3 dev eth0 proto bird
100.0.1.0/24 via 4.1.0.4 dev eth0 proto bird
101.0.1.0/24 via 4.1.0.3 dev eth0 proto bird
102.0.1.0/24 via 4.1.0.4 dev eth0 proto bird
Look at all those great BIRD routes! BIRD rules! 🐦💪
Ping around and find out!
Now that we think we've got everything configured, let's make sure that our internet functions exactly the way it has in our previous routing chapters (remember the Bad Old Days when we had to configure all the routes statically by hand? eew).
Try using your old friend ping to send a packet from client-c1 to server-s2. hopon client-c1 and run the ping command as follows:
root@client-c1:/# ping 9.2.0.12 -c1
PING 9.2.0.12 (9.2.0.12) 56(84) bytes of data.
64 bytes from 9.2.0.12: icmp_seq=1 ttl=58 time=0.326 ms

--- 9.2.0.12 ping statistics ---
1 packets transmitted, 1 received, 0% packet loss, time 0ms
rtt min/avg/max/mdev = 0.326/0.326/0.326/0.000 ms
💥 Dope! We have network connectivity across this great toy internet of ours! If this doesn't work, you'll need to troubleshoot your routes. Refer to the discover the breakage troubleshooting section from chapter 1.3 if you need some assistance.
Do a complete check of the whole network using the byoi-validate script
We're going to finish by running a script called byoi-validate to ensure that all of the routes across the network are working as expected. This is a bash script which automatically performs ping tests for you. It's going to run tests from one machine in each "eyeball-network" to every other machine on our internet. This ensures that there is correct routing out of each network. You'll need to be in the same directory that you've been running the hopon commands from (i.e. chapters/1.4-routing-rip), and you'll run the command byoi-validate. The output from that command, if everything is working correctly, should look like this:
$ byoi-validate

Testing IP connectivity from client-c1
...................................................................................

Testing IP connectivity from server-g3
...................................................................................

Testing IP connectivity from server-s1
...................................................................................

Testing IP connectivity from server-a1
...................................................................................
✅ No errors! Everything is working!
If that script reports any errors, your job is to go and fix them! Refer to the discover the breakage troubleshooting section from chapter 1.3 if you need some assistance.
Break that shit!
We just did a bunch of work that may not feel as easy or as simple as the work we did in setting up static routes. Why did we do that? Well, let's take a look one of the powers of using a routing protocol instead of statically-defined routes: namely, healing broken routes.
Here's a simplified version of our network map that will focus on a problem we'd like to explore:
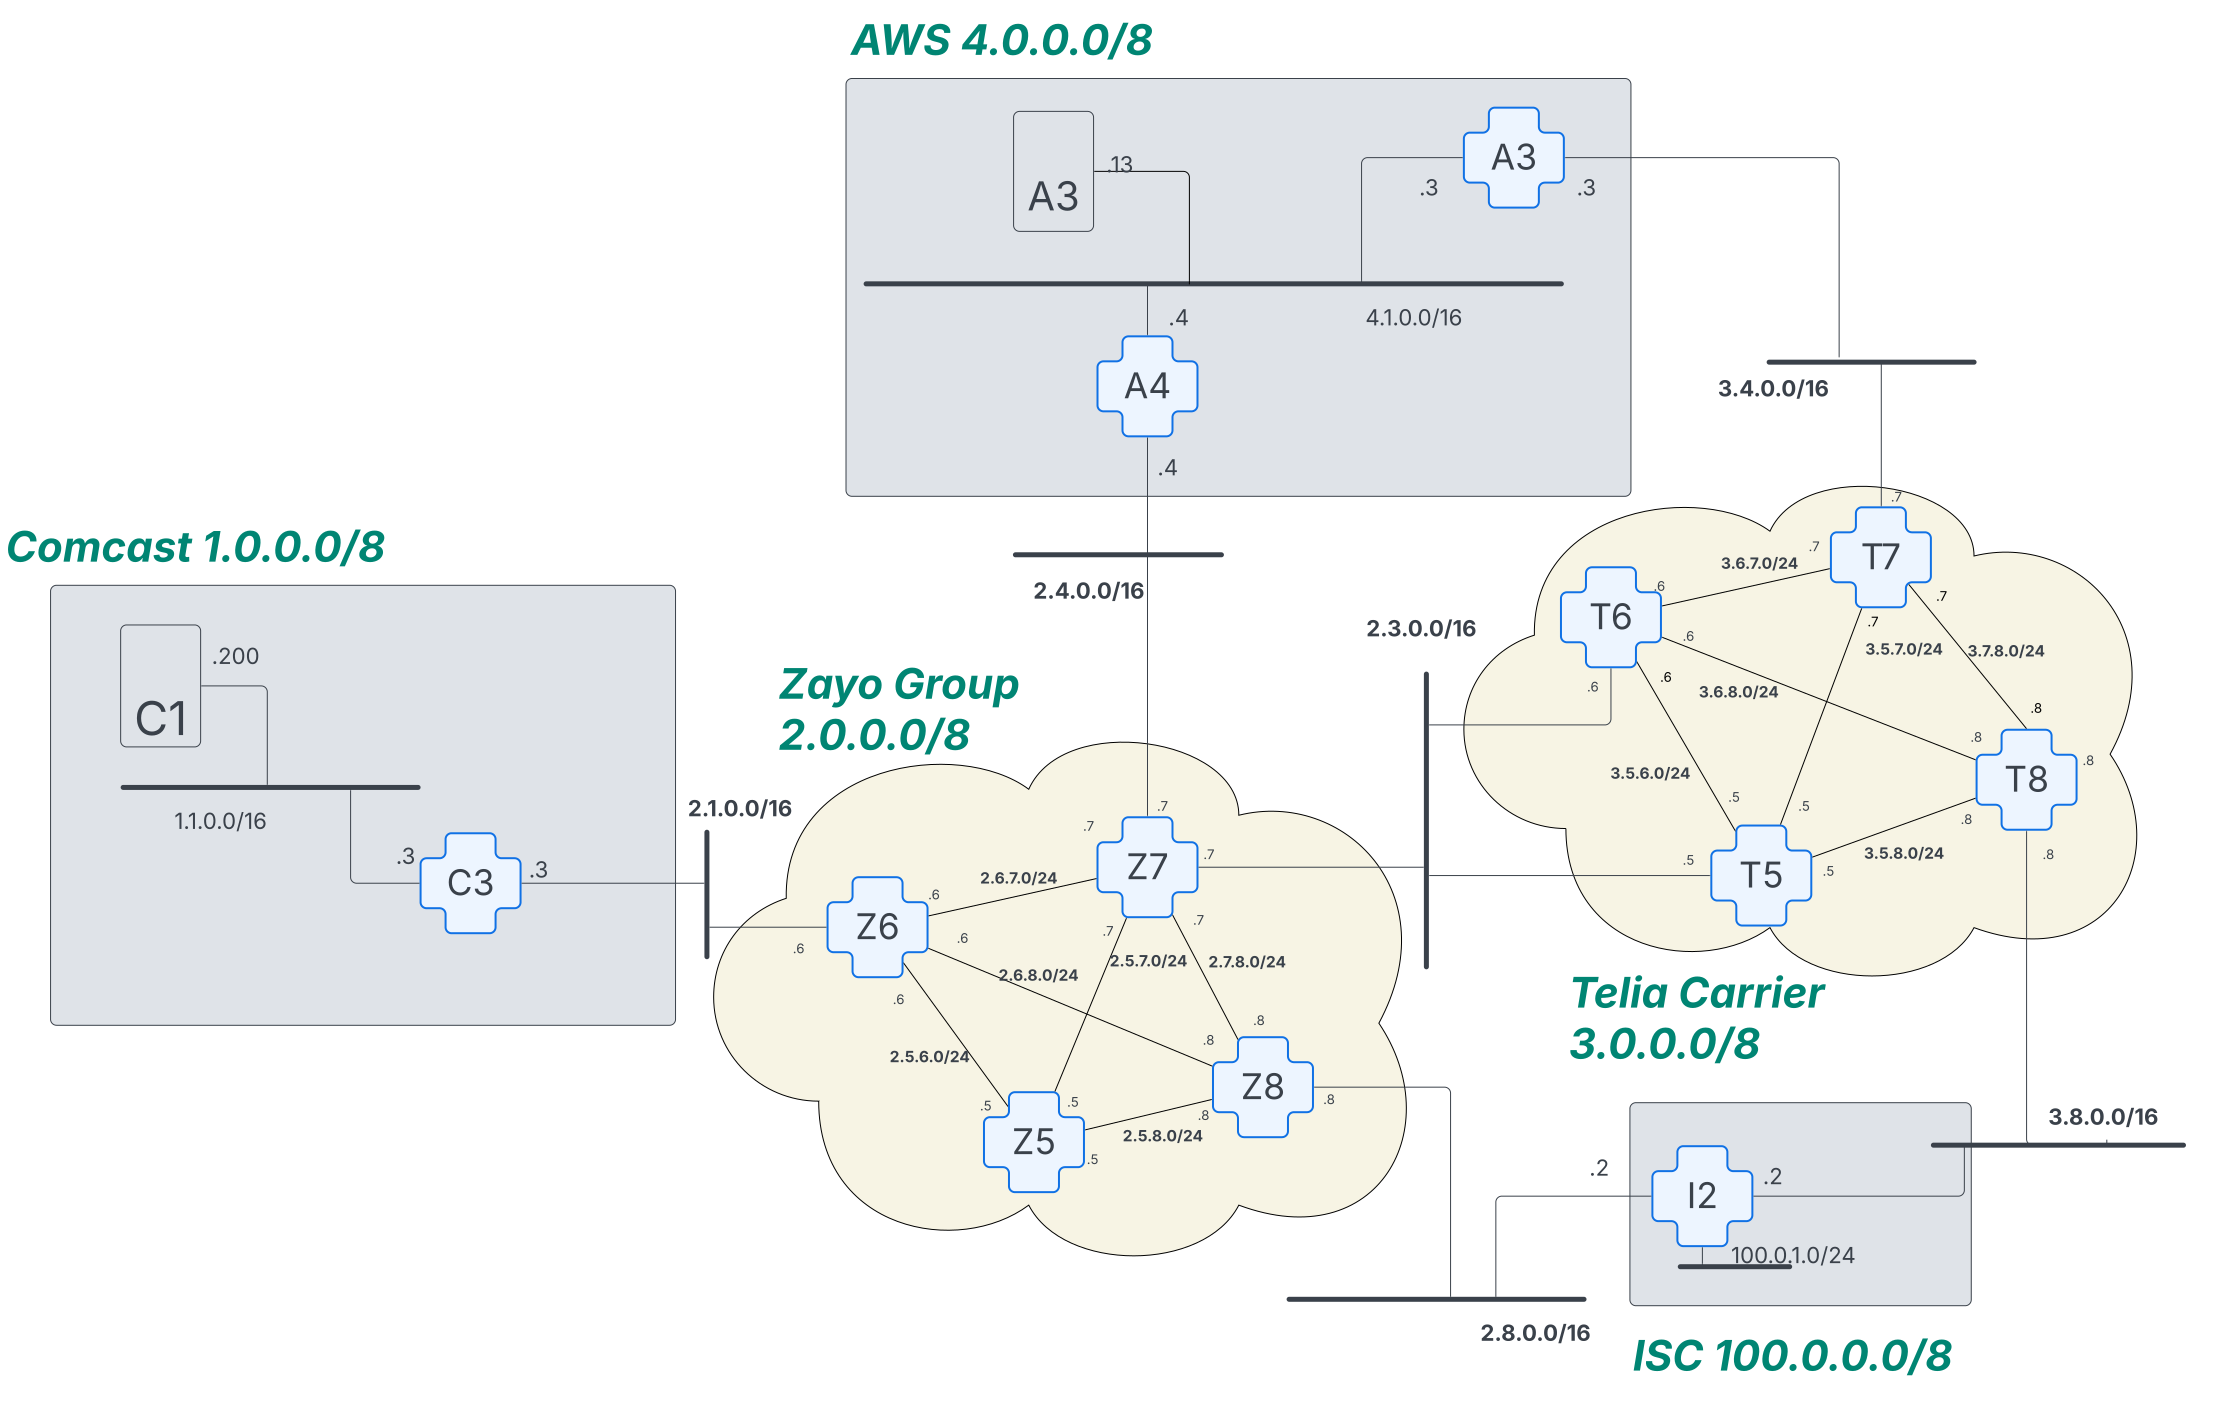
Trace the path that you think packets should take from client-c1 to server-a3. There are lots of possible options! Ideally, the routers are going to pick the shortest path from source to destination and back again. This means that, for this example, the path should be:
router-c3router-z6router-z7router-a4server-a3
What happens when one of those routers goes down? Since we've built our toy internet with redundant paths from one side of it to the other, it would be best if we could have our packets automatically re-routed to a less-optimal route rather than connectivity being permanently broken until a network administrator goes and fixes it! Well, our routing protocol (RIP) should be able to do this for us. Let's see if it can!
The exercise we're going to do is to take router-z7 offline and see if the RIP protocol can successfully re-route traffic to another path. What path do you think packets should take if router-z7 goes offline? Our suggestion would be:
router-c3router-z6router-z8router-i2router-t8router-t7router-a3server-a3
Clearly, this path is not as good, but at least packets still get to their destination and nobody had to be paged to fix the problem manually.
Setting up monitoring
So let's give this a try, but let's set up some monitoring on a few key routers so we can have a front-row seat to the action that BIRD is taking to mend our network! We're therefore going to ask you to open up a bunch of terminal windows. We recommend that you organize your terminal windows something like the following so that you can remember what terminal is connected to what system:
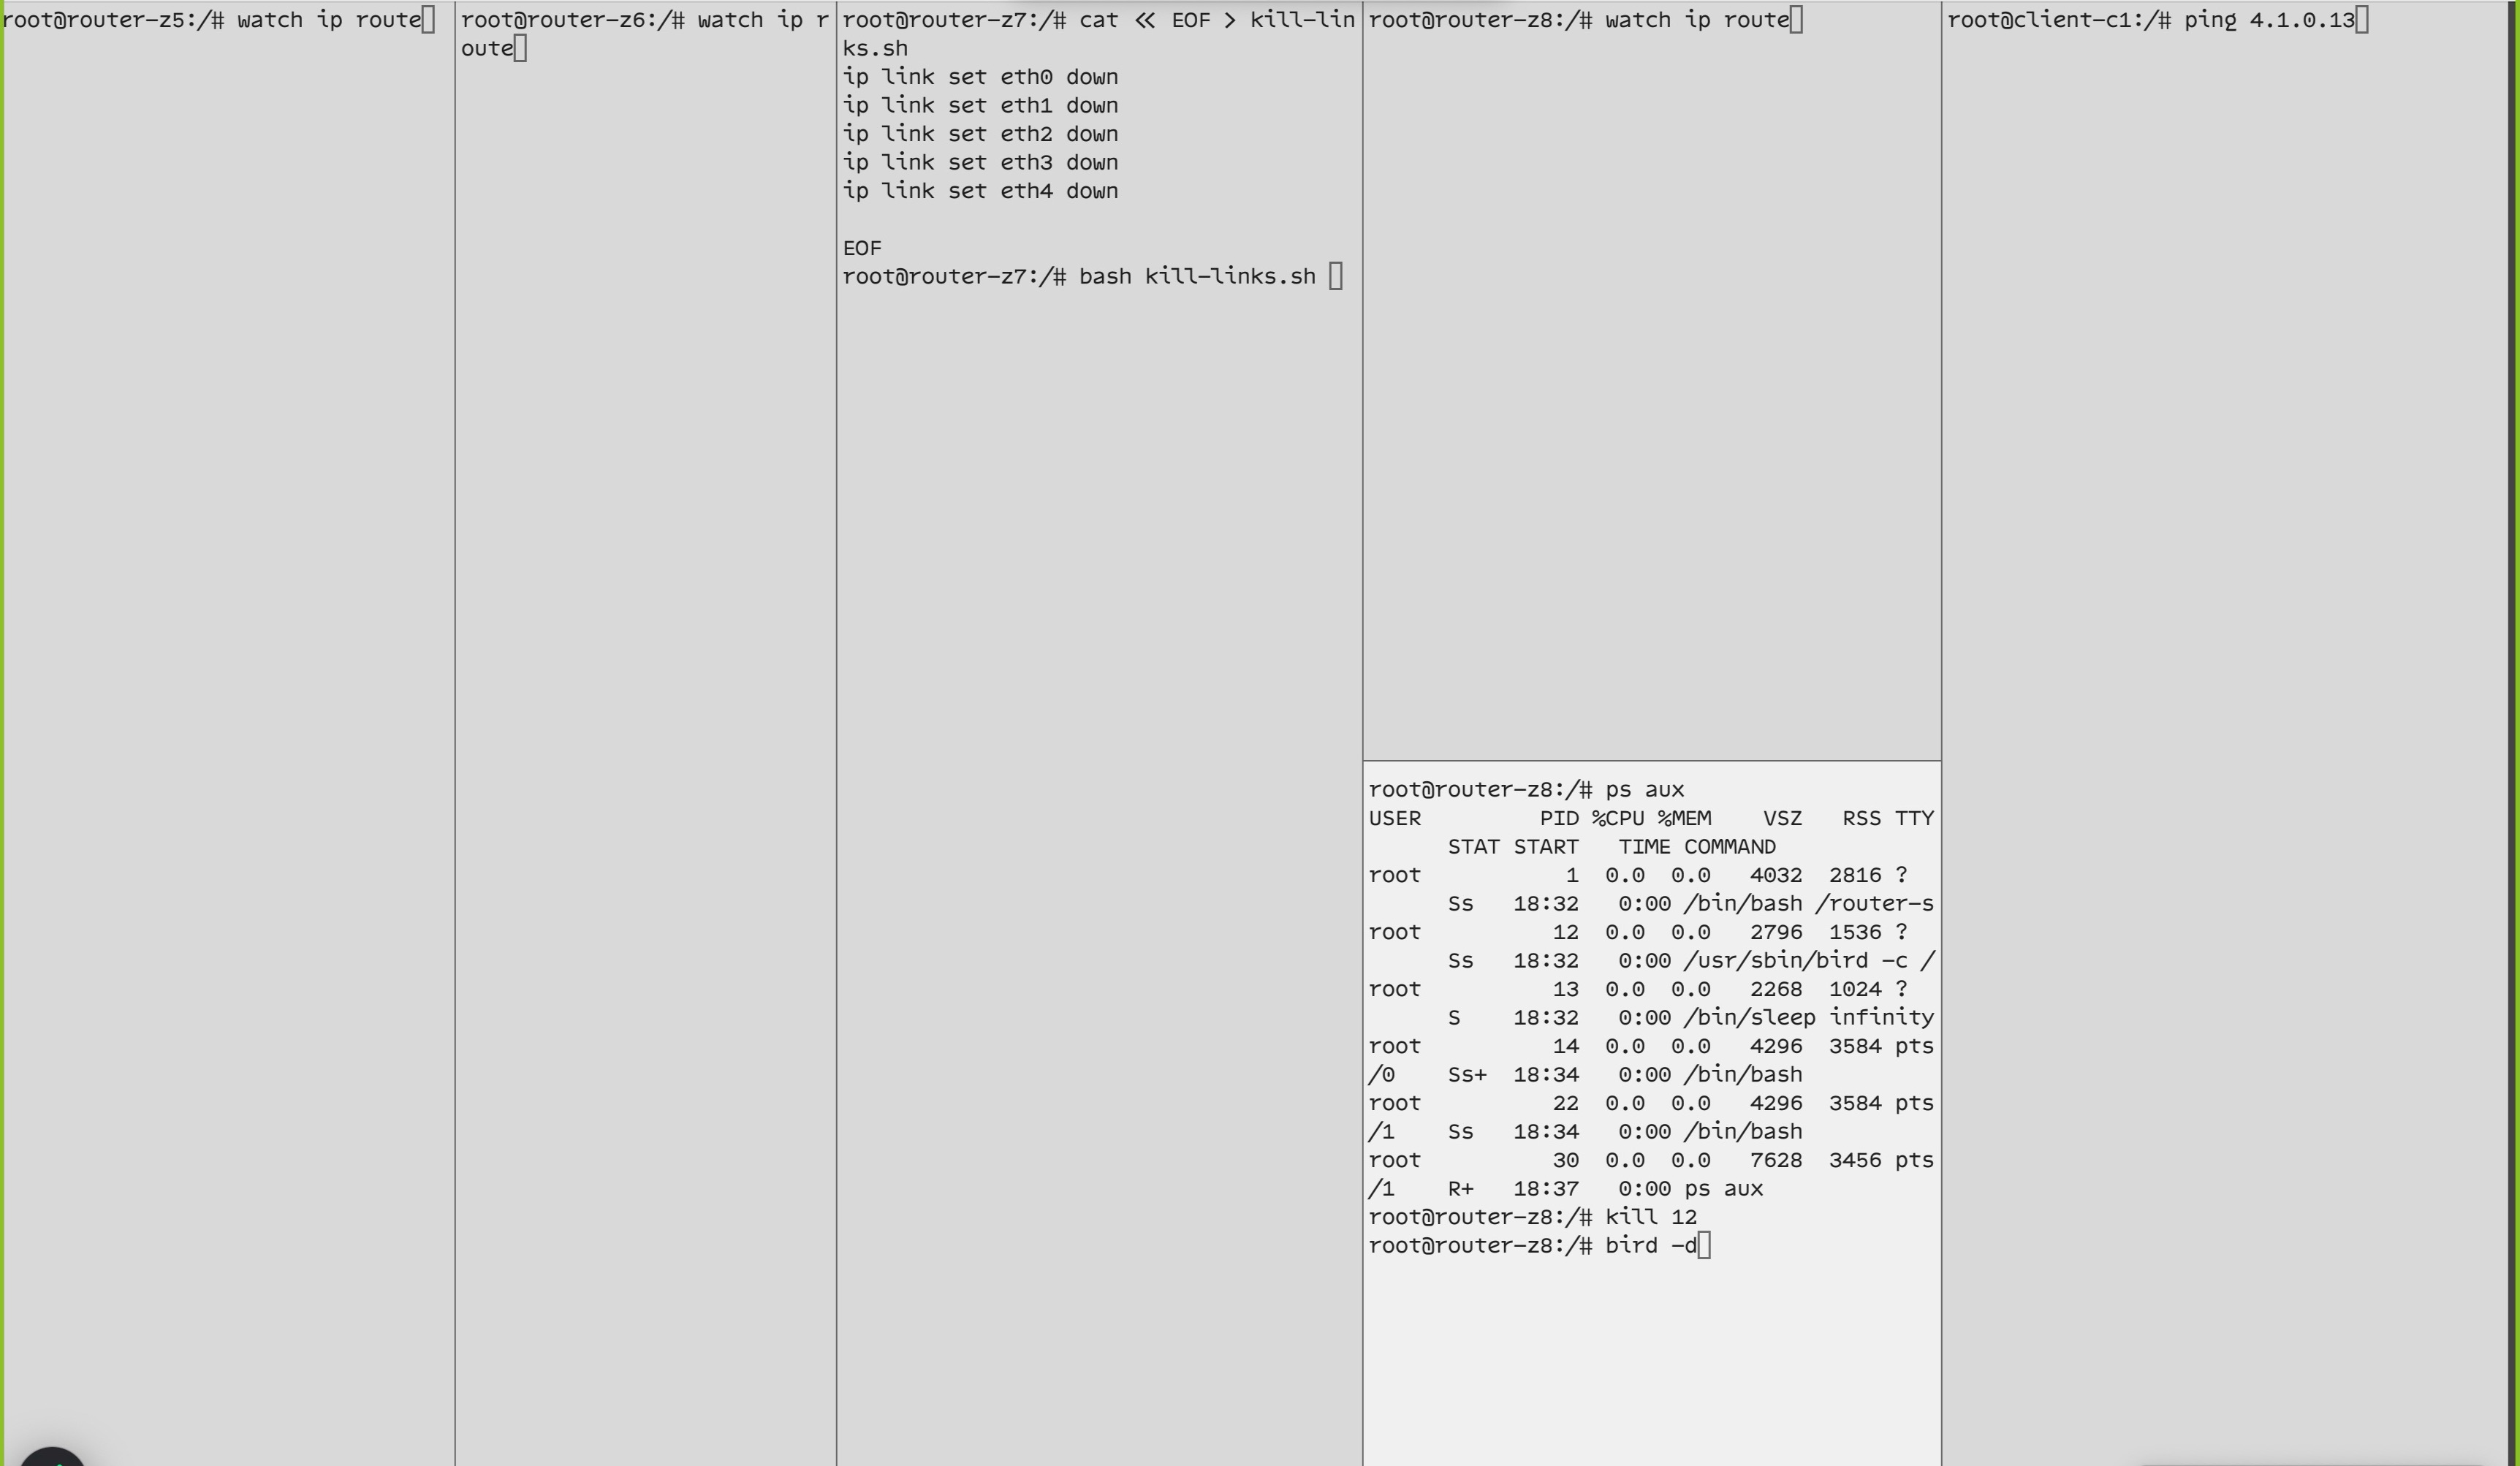
1. run the watch ip route commands
In the windows for router-z6, router-z5 and router-z8, run the command watch ip route. All of these routers should have the same route for 4.1.0.0/16, 4.2.0.0/16, and 4.3.0.0/16. Hopefully this will eventually change when RIP reconfigures itself after router-z7 goes down. Leave these commands running in these windows. We'll be going back and watching these windows soon.
By the way, looking at the output of the ip route command, we can validate our assumptions about the path that we think packets currently take from client-c1 to server-a3. Since all packets that leave the comcast network must be sent through router-z6, this machine is the crux of this operation. So notice the routing table for routes destined to AWS (i.e. 4.0.0.0/8) in all of these windows:
...
4.1.0.0/16 via 2.6.7.7 dev eth3 proto bird
4.2.0.0/16 via 2.6.7.7 dev eth3 proto bird
4.3.0.0/16 via 2.6.7.7 dev eth3 proto bird
...
There are a lot of routes here. Since we only care about the routes to the AWS network, we're only showing the routes that start with 4.. As you can see from this printout, each router wants to send packets to 2.6.7.7 (a.k.a. router-z7) for all these networks, which is perfect!
2. Restart router-z8 in debugging mode
If you look at the network map, you'll see that, if router-z7 goes down, the only other path that packets can take to exit this network is router-z8. Watching what's happening on this router will give us a lot of information! Therefore, on the second window to router-z8, we want to see debugging information from BIRD. To do this, we need to restart BIRD in debugging mode. You're going to first need to kill the existing running background process for BIRD. Use the ps and kill commands to find the running BIRD process and stop it. Then run bird -d to restart BIRD in the foreground in debugging mode.
3. Run ping from client-c1
Next, on the client-c1 window, run ping 4.1.0.13 to have a continuous ping going on so we can see when packets start getting lost and hopefully when the network is healed and packets start going through again.
4. Prepare router-z7 to be shut down
Finally, we're going to use that last window which is open to router-z7. We're going to shut down all of the network interfaces on this router to effectively cut the router off of the network entirely and force all the other routers on our toy internet to make new routing decisions for the AWS destinations.
We're going to make a little script to shut all the interfaces down at once. Paste the following here doc into the terminal for router-z7:
cat << EOF > kill-links.sh
ip link set eth0 down
ip link set eth1 down
ip link set eth2 down
ip link set eth3 down
ip link set eth4 down

EOF
What you just did creates a new file called kill-links.sh. In this file, we run the ip link command. This command is similar to the ip addr command that we've used in previous chapters. The ip link command gives us control of the network interfaces on this machine. By setting them down, those interfaces will no longer send or receive packets.
Let's watch the fireworks
Before we shut down router-z7, let's take a moment and think about what we expect to happen. What is going to happen with the ping output on client-c1? Will it stop immediately? How will it stop? What messages might you see? On each of the routers, what do you think might happen to each of the routing tables over time?
One thing to keep in mind is that RIP is not a very efficient routing protocol. It has what is known as slow "convergence" time, meaning, it takes a long time for it to figure out how to re-route packets when there's an outage. You might therefore have to wait as long as ten minutes for things to settle down and reach stable-state. Some routes will change immediately when you shut all the interfaces off on router-z7, and some routes will take longer. Some routes may "flap" around, meaning that they change multiple times before they settle down. Luckily, this gives you plenty of time to observe!
Okay, without further ado, let's run the script by typing bash kill-links.sh into router-z7 and watch the sparks fly!
How long does it take for an error message to show up on the client? Did you notice that the ping output stopped immediately on the client? You can type an <ENTER> in the client-c1 terminal to make it obvious that ping is no longer receiving response messages from server-a3 and to make it more obvious when it restarts.
You may see some of the following. Think about what each of these might mean:
client-c1window:From 2.1.0.6 icmp_seq=1059 Destination Host Unreachableclient-c1window:From 1.1.0.3 icmp_seq=1203 Destination Net Unreachablerouter z8window:4.3.0.0/16 via 2.8.0.2 dev eth0 proto bird
What do you think each of these messages means? Do you remember what ICMP errors are from previous chapters? If you want to verify your understanding of these things, go check the appendix.
Make sure to take a moment to read through the BIRD logging output on router-z8, which should look something like this:
bird: kernel1 < removed 4.3.0.0/16 via 2.7.8.7 on eth2
bird: rip1 < removed 4.3.0.0/16 via 2.7.8.7 on eth2
bird: rip1 > removed [sole] 4.2.0.0/16 via 2.7.8.7 on eth2
bird: kernel1 < removed 4.2.0.0/16 via 2.7.8.7 on eth2
bird: rip1 < removed 4.2.0.0/16 via 2.7.8.7 on eth2
bird: rip1 > removed [sole] 2.3.0.0/16 via 2.7.8.7 on eth2
bird: kernel1 < removed 2.3.0.0/16 via 2.7.8.7 on eth2
bird: rip1 < removed 2.3.0.0/16 via 2.7.8.7 on eth2
bird: rip1 > removed [sole] 3.5.7.0/24 via 2.7.8.7 on eth2
bird: kernel1 < removed 3.5.7.0/24 via 2.7.8.7 on eth2
bird: rip1 < removed 3.5.7.0/24 via 2.7.8.7 on eth2
bird: rip1 > removed [sole] 3.5.6.0/24 via 2.7.8.7 on eth2
bird: kernel1 < removed 3.5.6.0/24 via 2.7.8.7 on eth2
bird: rip1 < removed 3.5.6.0/24 via 2.7.8.7 on eth2
bird: rip1 > removed [sole] 2.4.0.0/16 via 2.7.8.7 on eth2
bird: kernel1 < removed 2.4.0.0/16 via 2.7.8.7 on eth2
bird: rip1 < removed 2.4.0.0/16 via 2.7.8.7 on eth2
bird: rip1 > removed [sole] 3.4.0.0/16 via 2.7.8.7 on eth2
bird: kernel1 < removed 3.4.0.0/16 via 2.7.8.7 on eth2
bird: rip1 < removed 3.4.0.0/16 via 2.7.8.7 on eth2
bird: rip1 > added [best] 3.6.8.0/24 via 2.8.0.2 on eth0
bird: kernel1 < replaced 3.6.8.0/24 via 2.8.0.2 on eth0
bird: rip1 < replaced 3.6.8.0/24 via 2.8.0.2 on eth0
bird: rip1 > removed 2.7.8.0/24 via 2.7.8.7 on eth2
bird: rip1 > removed [sole] 3.6.7.0/24 via 2.7.8.7 on eth2
bird: kernel1 < removed 3.6.7.0/24 via 2.7.8.7 on eth2
bird: rip1 < removed 3.6.7.0/24 via 2.7.8.7 on eth2
bird: rip1 > ignored 2.6.7.0/24 via 2.6.8.6 on eth3
bird: rip1 > added [best] 3.5.8.0/24 via 2.8.0.2 on eth0
bird: kernel1 < replaced 3.5.8.0/24 via 2.8.0.2 on eth0
bird: rip1 < replaced 3.5.8.0/24 via 2.8.0.2 on eth0
bird: rip1 > removed [sole] 101.0.1.0/24 via 2.7.8.7 on eth2
bird: kernel1 < removed 101.0.1.0/24 via 2.7.8.7 on eth2
bird: rip1 < removed 101.0.1.0/24 via 2.7.8.7 on eth2
If it doesn't make sense immediately, google some answers, try it again, or otherwise play around with it until it feels like you can tell the story of what's going on here.
One trick we have found in digesting output we don't understand is to take it line-by-line. Look at a single line, think about the network map and think about what you know from the ip addr output. Try to tell the story one line at a time. Not every line has to make complete sense, and if you have to skip over a few lines before you have something to sink your teeth into, that's okay.
In addition to looking at logs and examining routes with the ip route command, you might want to refer to the handy commands section in the appendix.
Once everything settles down and you feel confident about what happened, let's move on the next exercise: bringing the router back online.
Exercises
Exercise: Bring the router back online
To take the router offline, we provided you with a script. That script called to an ip command: ip link. Can you modify that script so that it brings the interfaces back up on router-z7?
Once you do, you'll know you've done things correctly if you watch the terminal output and see that our routers have found the better route through the reinstated router-z7.
Exercise: Try a better routing protocol!
The routing protocol people tend to reach for when they're doing stuff like what we're doing with RIP is called "OSPF". OSPF stands for "Open Shortest Path First", which really doesn't make any sense. But they're trying to say "This Is A Cool Routing Protocol That Does Stuff Efficiently", but TIACRPTDSE is a bad acronym.
We're going to give you a configuration for OSPF so that you can try it in your toy internet and see how it works. We've already shown you a path for rolling out configuration and shown you some techniques for testing it. So we think you're ready to give it a try on your own. If you get stuck there's a bird-ospf.conf configuration you can copy from in the final directory.
On each of your routers, replace the rip section in /etc/bird/bird.conf with a new ospf section, as follows:
protocol ospf {
  export all;  # Send all BIRD routes into OSPF (e.g., direct routes)
  import all;  # Accept all OSPF-learned routes

  area 0 {
    interface "*" {
      type broadcast;     # good for Ethernet, or switch-style topologies
      hello 10;           # seconds between hellos (default: 10)
      wait 40;            # wait time before DR election (default: 40)
      dead 40;            # time to consider neighbor down (default: 40)
    };
  };
}
To get BIRD to notice the changes to its configuration file, you can either restart the BIRD daemon using the ps and kill commands or, you can use the handy birdc configure command which will tell BIRD to re-read its configuration file.
Before you restart, what do you think you'll see when you have ospf running on a single machine?
Things to observe:
- Keep a window open on your first ospf router, running
watch ip routeon it. What changes do you see as you enable ospf router-by-router? - Do RIP and OSPF communicate directly with each other?
- Do the same exercise we did above, killing
router-z7. What differences did you notice in how quickly the routers healed their connections? What differences did you see when you startedrouter-z7back up?
Future / summary / thinking about next chapter
In this chapter, we looked at our first "routing protocol": RIP. RIP allowed us to propagate routes to networks across our toy internet without manually configuring each router. What problems did you see solved by RIP? How would this make the process of adding new networks easier?
Now let's talk about the limitations of RIP. There's a reason nobody uses RIP anymore. The "Real Internet" has long since upgraded to newer, more efficient, more secure routing protocols. You probably noticed a common refrain in these chapters of "does it scale?" and "is it secure?".
As for scaling, we saw in the exercises that OSPF heals routing problems much faster than RIP does. But what about security? Let's take for example, how RIP decided to heal our network problems: it used ISC as a "transit" network from Zayo to Telia. But what if ISC doesn't want to be a transit network? That would be like having a big fancy mansion with a circular driveway and, when a huge pothole shows up in the road, all the traffic decides to route through your driveway. Not cool, man!
Let's think about this as a solution to Zayo and Telia's problems. First of all, it's common for an organization like ISC to want to have more than one network connection in case they have a network provider that experiences an outage. ISC has servers that clients need to hit and by having redundant network connections, it can ensure that clients can always reach them. Typically, when a company like ISC gets these connections from a transit provider like Zayo or Telia, they are paying for bandwidth that is exclusively theirs to use.
Could you imagine setting up a datacenter and having two redundant network connections to two different internet providers for the sake of making sure that your network services were 100% reliable and finding out that your network providers were using you to heal their network connectivity problems. That would be ¡super no bueno! Let's say Zayo and Telia had an agreement to route traffic through Google in the case of an emergency: we'd want to use a routing protocol that could implement an agreement like that and not just pick some random sucker network like ISC to route its traffic through.
Clearly, RIP doesn't have a nuanced business understanding of the relationships that take place between various network entities. That's a security problem!
In a future chapter, we'll take a look at BGP, which will address understanding the problem of business relationships between network providers.
Finally, remember that we did some hand-waving about how BIRD accomplishes its tasks for implementing RIP. Now might be a good opportunity to spend some quality-time understanding the internals of BIRD.
Appendix
Handy commands
There are a few commands that you can run with birdc (which is like the "bird command-line interface" or something?) to help you understand what BIRD is doing. Here are some commands that we have found helpful in debugging bird!
birdc show route export rip1This shows the routing table that bird is propagating out to all other routers who speak the rip protocol. Much of this output should look similar to when you type ip route. See if you can find which interface each route will take for the next-hop and the hop-count for the destination network. You can see when the route was learned from RIP.
birdc configureWhen you want to make a change to BIRD's configuration, you have to modify the /etc/bird/bird.conf file. Software like BIRD reads its configuration file at startup time, but it doesn't continually check for changes to that file. When you make changes to the BIRD configuration file, you need to tell the software to re-load the configuration. In other places, we discover the process-id using ps and kill, but BIRD comes with this handy command which will tell BIRD to reload the config file without going through all those steps.
birdc show route allThis shows the internal BIRD routing table. Sometimes it's helpful to know what routes BIRD knows and how it knows them. This shows every route that BIRD has learned, either through directly-connected interfaces, routes that it may have learned through routing protocols such as RIP, or routes injected through other means (such as static routes).
How BIRD works
This is complicated and it's okay if this takes a few read-throughs before you understand how this works. To make this more accessible, let's use a diagram to show the flow of information through BIRD and between routers.
First, let's introduce a new diagram!
This diagram is a conceptual picture of router-R1 communicating with routers R2 and R3. This focuses first on router-R1 and the BIRD software that runs on it. It shows further details of the constituent pieces of BIRD's inner workings and how those inner-workings interface with the machine itself and with the other routers.
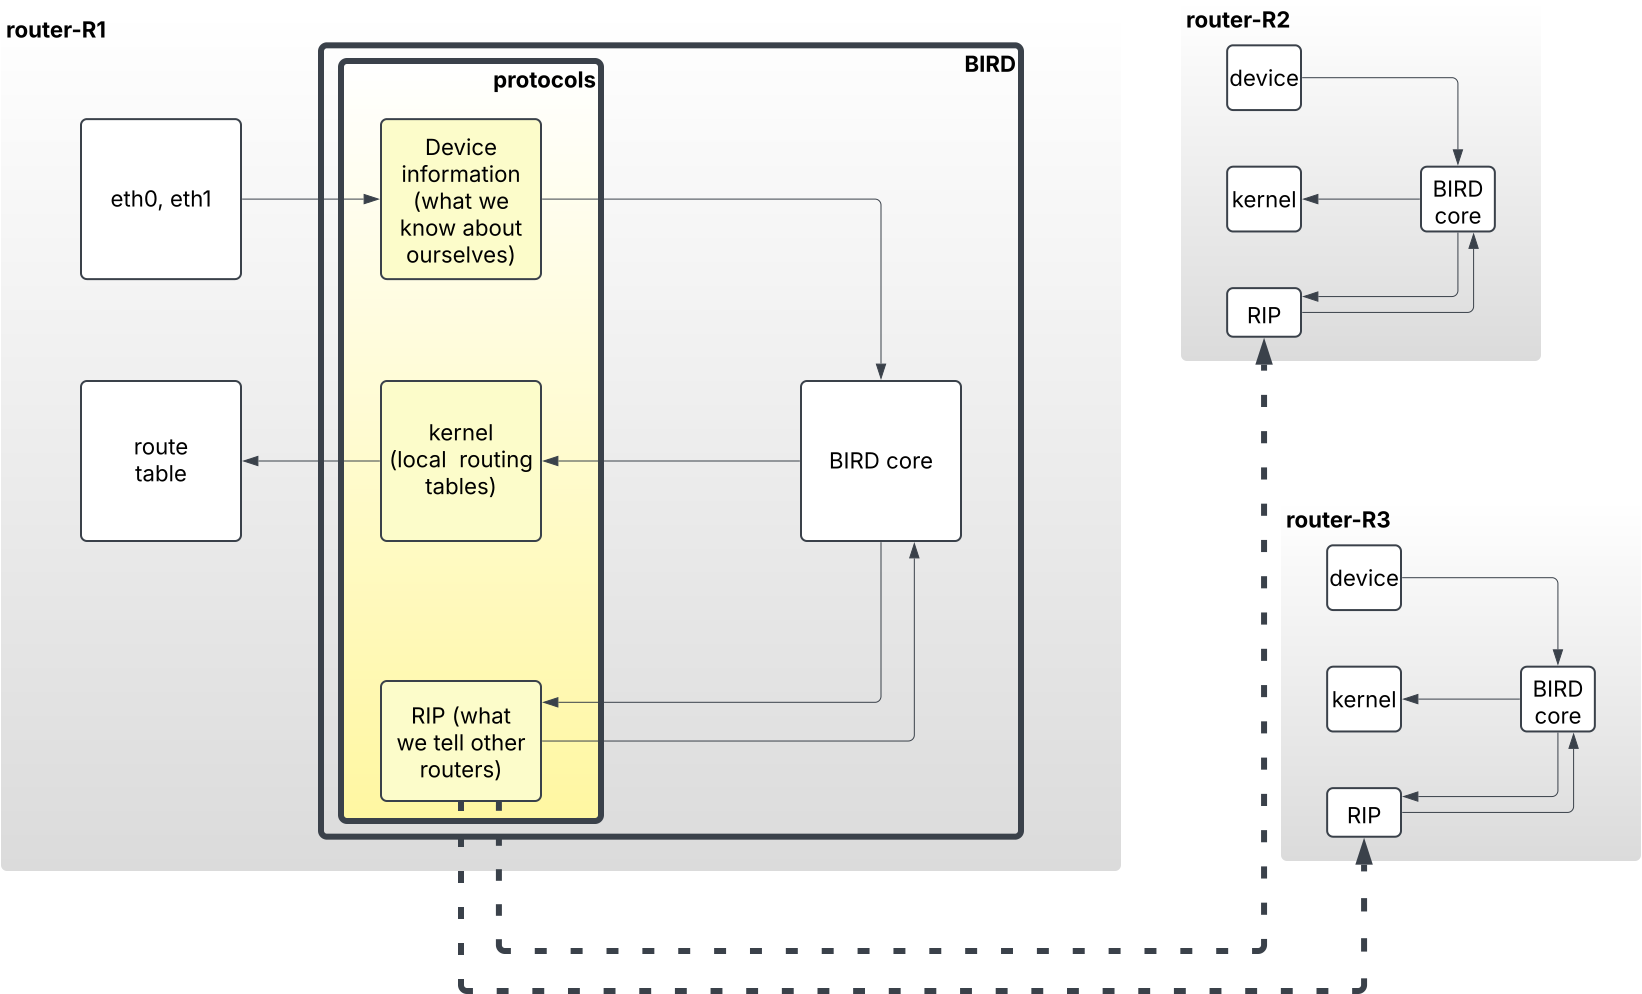
On the far left, we have stuff that exists "outside" of BIRD:
- eth0, eth1: The network interfaces of the machine which connect it to the networks that it sends packets on
- route table: the machine's routing table which provides instructions for where to send packets to networks.
Moving to the right, we next encounter a giant box labelled BIRD. This is the BIRD software and all of its constituent pieces (i.e. "protocols"). As we move into BIRD, the first big yellow box represents the BIRD protocols we're worked with in this chapter. Let's briefly look at each of these:
device: empowers BIRD to learn what network interfaces (or "devices") exist on this machine and their up/down status.kernel: controls how routing information gets into and out of the route table for this machine.RIP: configures communication with other routers using RIP.
📝 NOTE: What does this "protocol" word mean in this context? It feels pretty "jargonny!" BIRD uses the word "protocol" to indicate sources and destinations for routing information. We'll look at this in more depth as we continue through this explanation, but at a high level, it specifies where BIRD is able to learn about routes and where it's able to communicate that routing information.
Finally, we have the box labelled BIRD core which manages organizing information between protocols to create a coherent routing table for the router.
But what does this process look like on a larger internet? How exactly does route information get collected and distributed by BIRD amongst routers using RIP?
To answer that question, we're going to give you a Giant Step-by-Step Diagram™! It's going to start with how the router collects information about its own network connections. Next, it will go through the process of how it uses the RIP protocol to communicate that information to other routers. This will enable each router to build a full routing table for the entire internet.
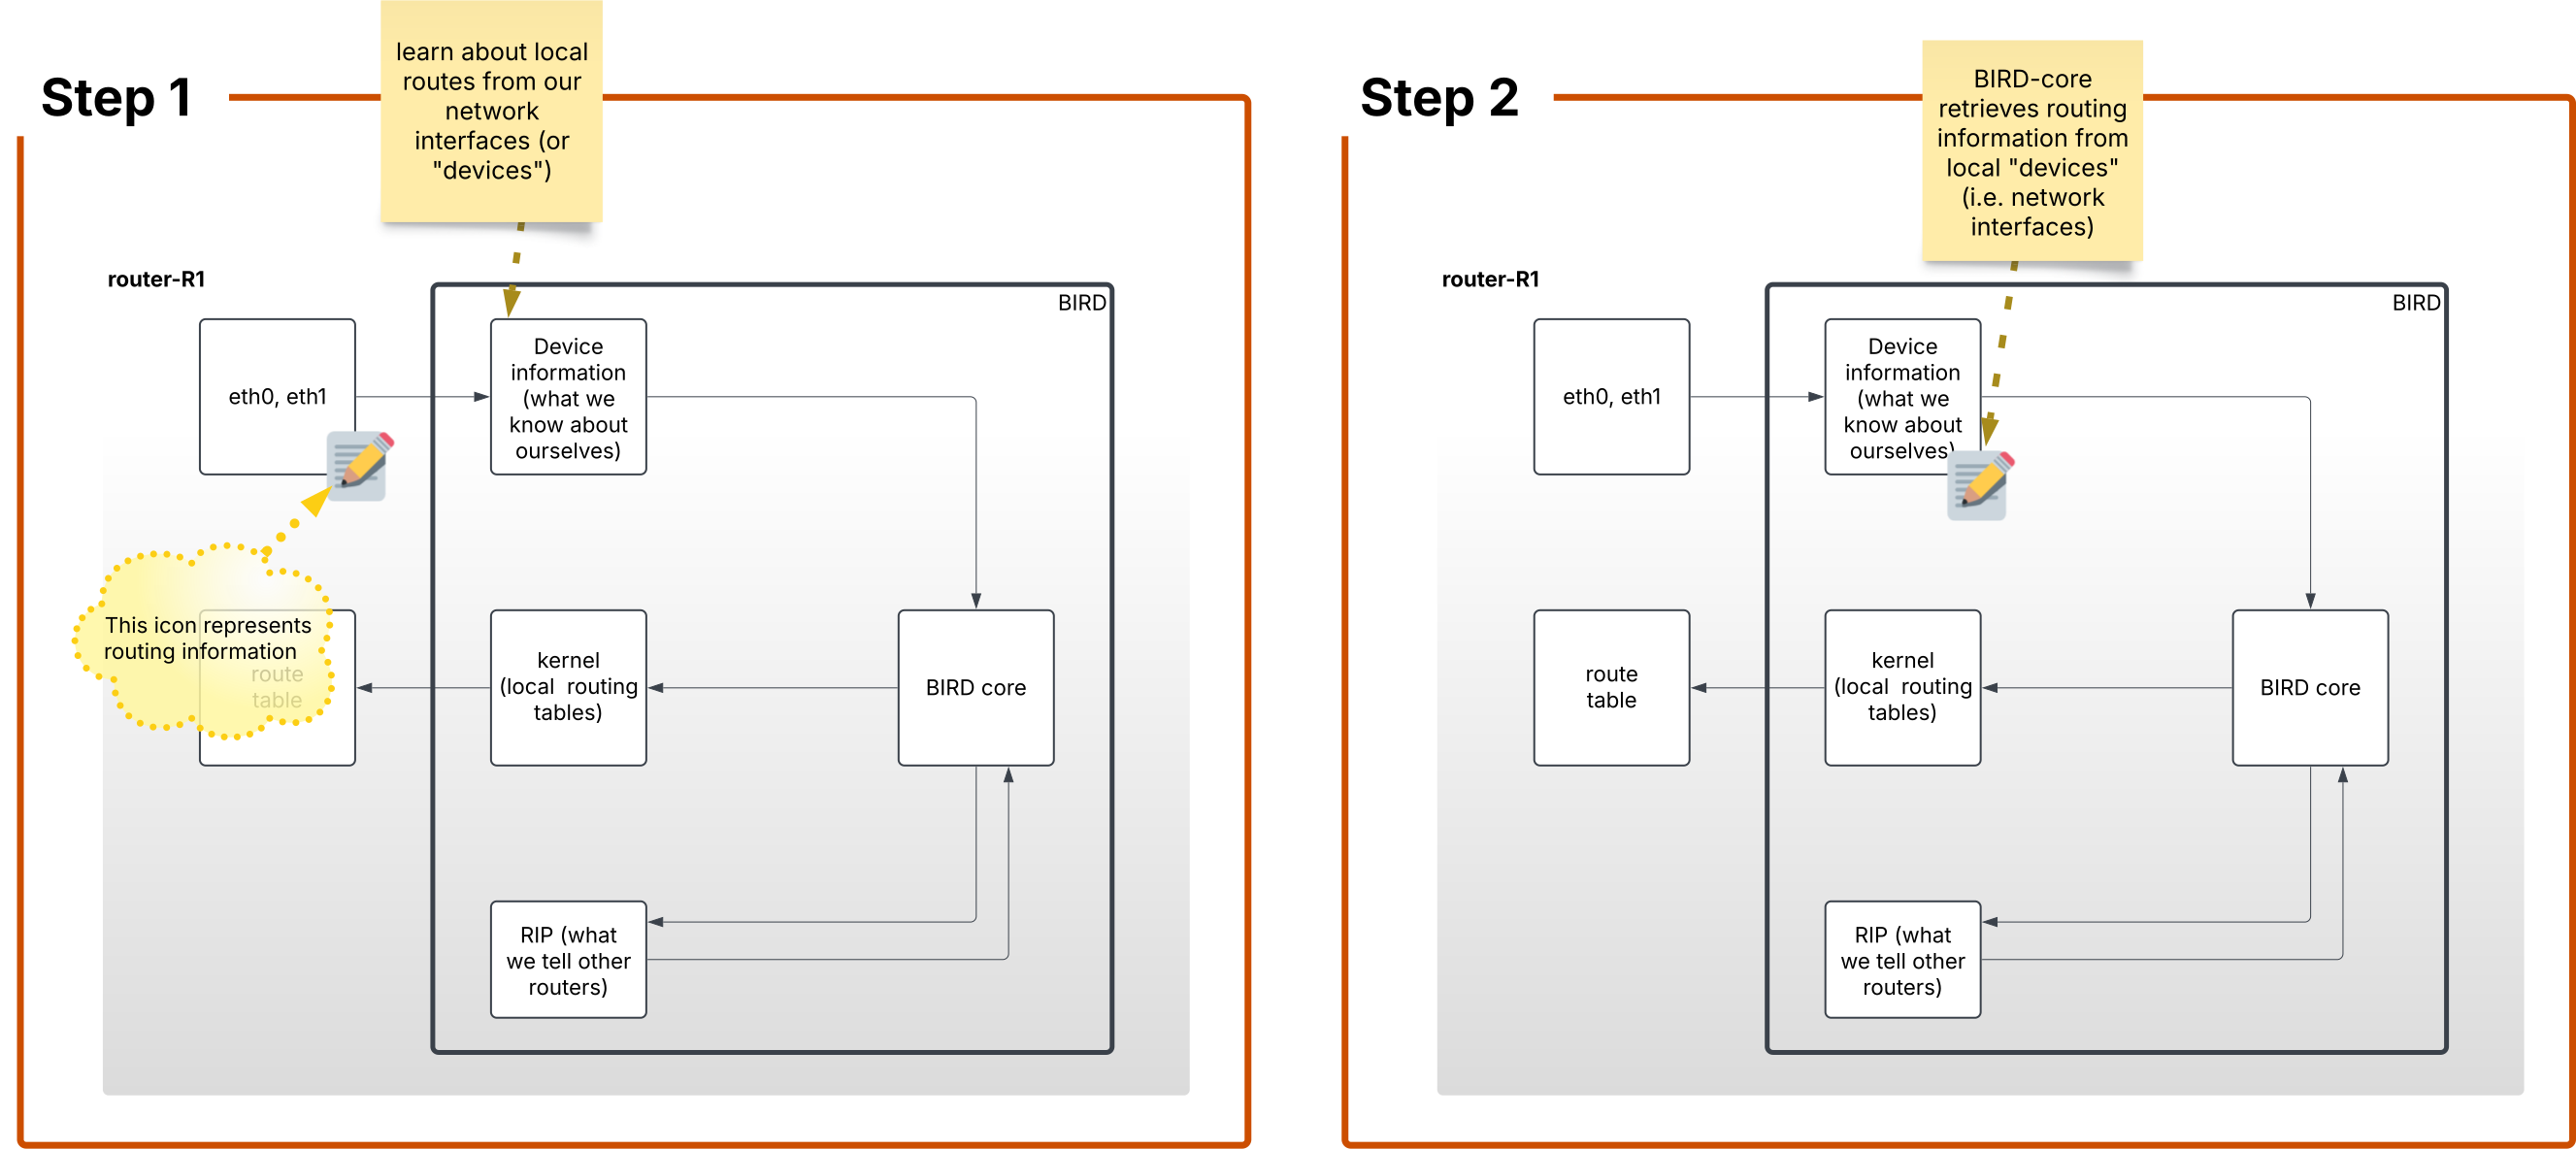
Step 1. The device protocol in BIRD will learn about the local routes (i.e. the networks that the router has interfaces on).
Step 2. The BIRD software receives the routes it learned about from the router's local devices. BIRD-core maintains its own routing data.
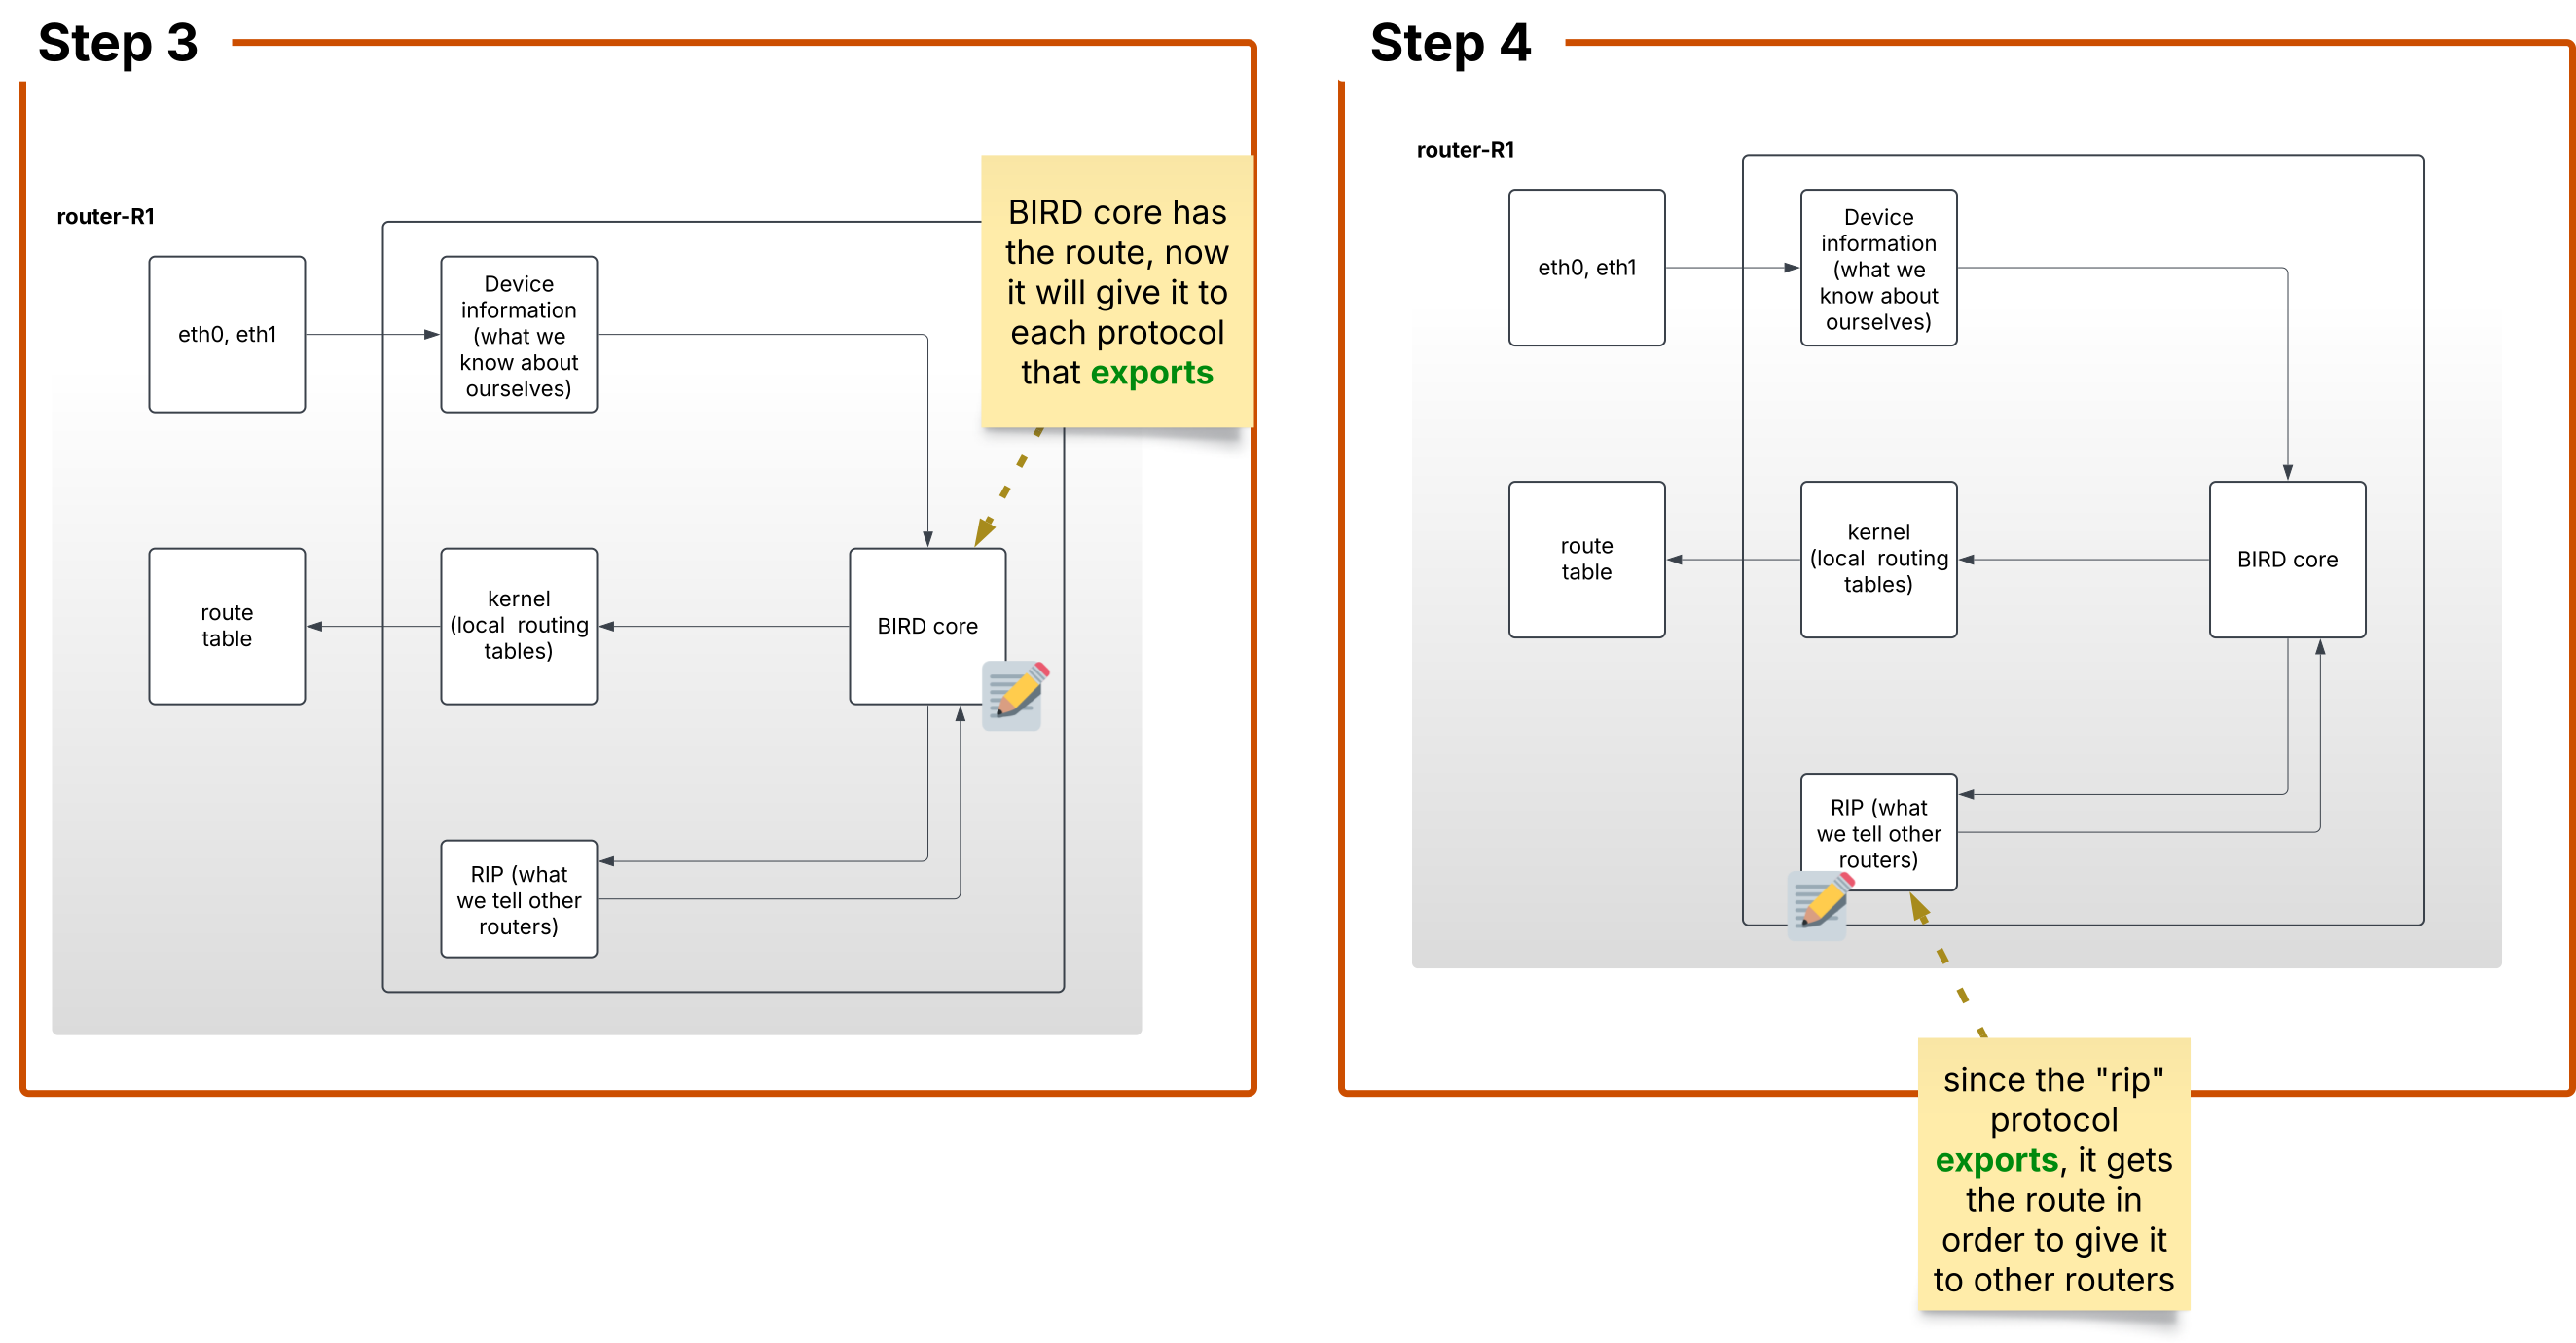
Step 3 BIRD finds which protocols export their data. export is a setting on a protocol that tells BIRD-core that it is allowed to send routes to that protocol.
To pass data around, BIRD has two keywords that each protocol can use to dictate how routing information flows through the system. import dictates whether or not to pull information from the protocol into BIRD-core. Once BIRD has imported routing information to its own routing table, export indicates which protocols should receive that information.
Step 4 In our chapter's RIP configuration, the RIP protocol does have the export flag, it receives the routes from BIRD-core.
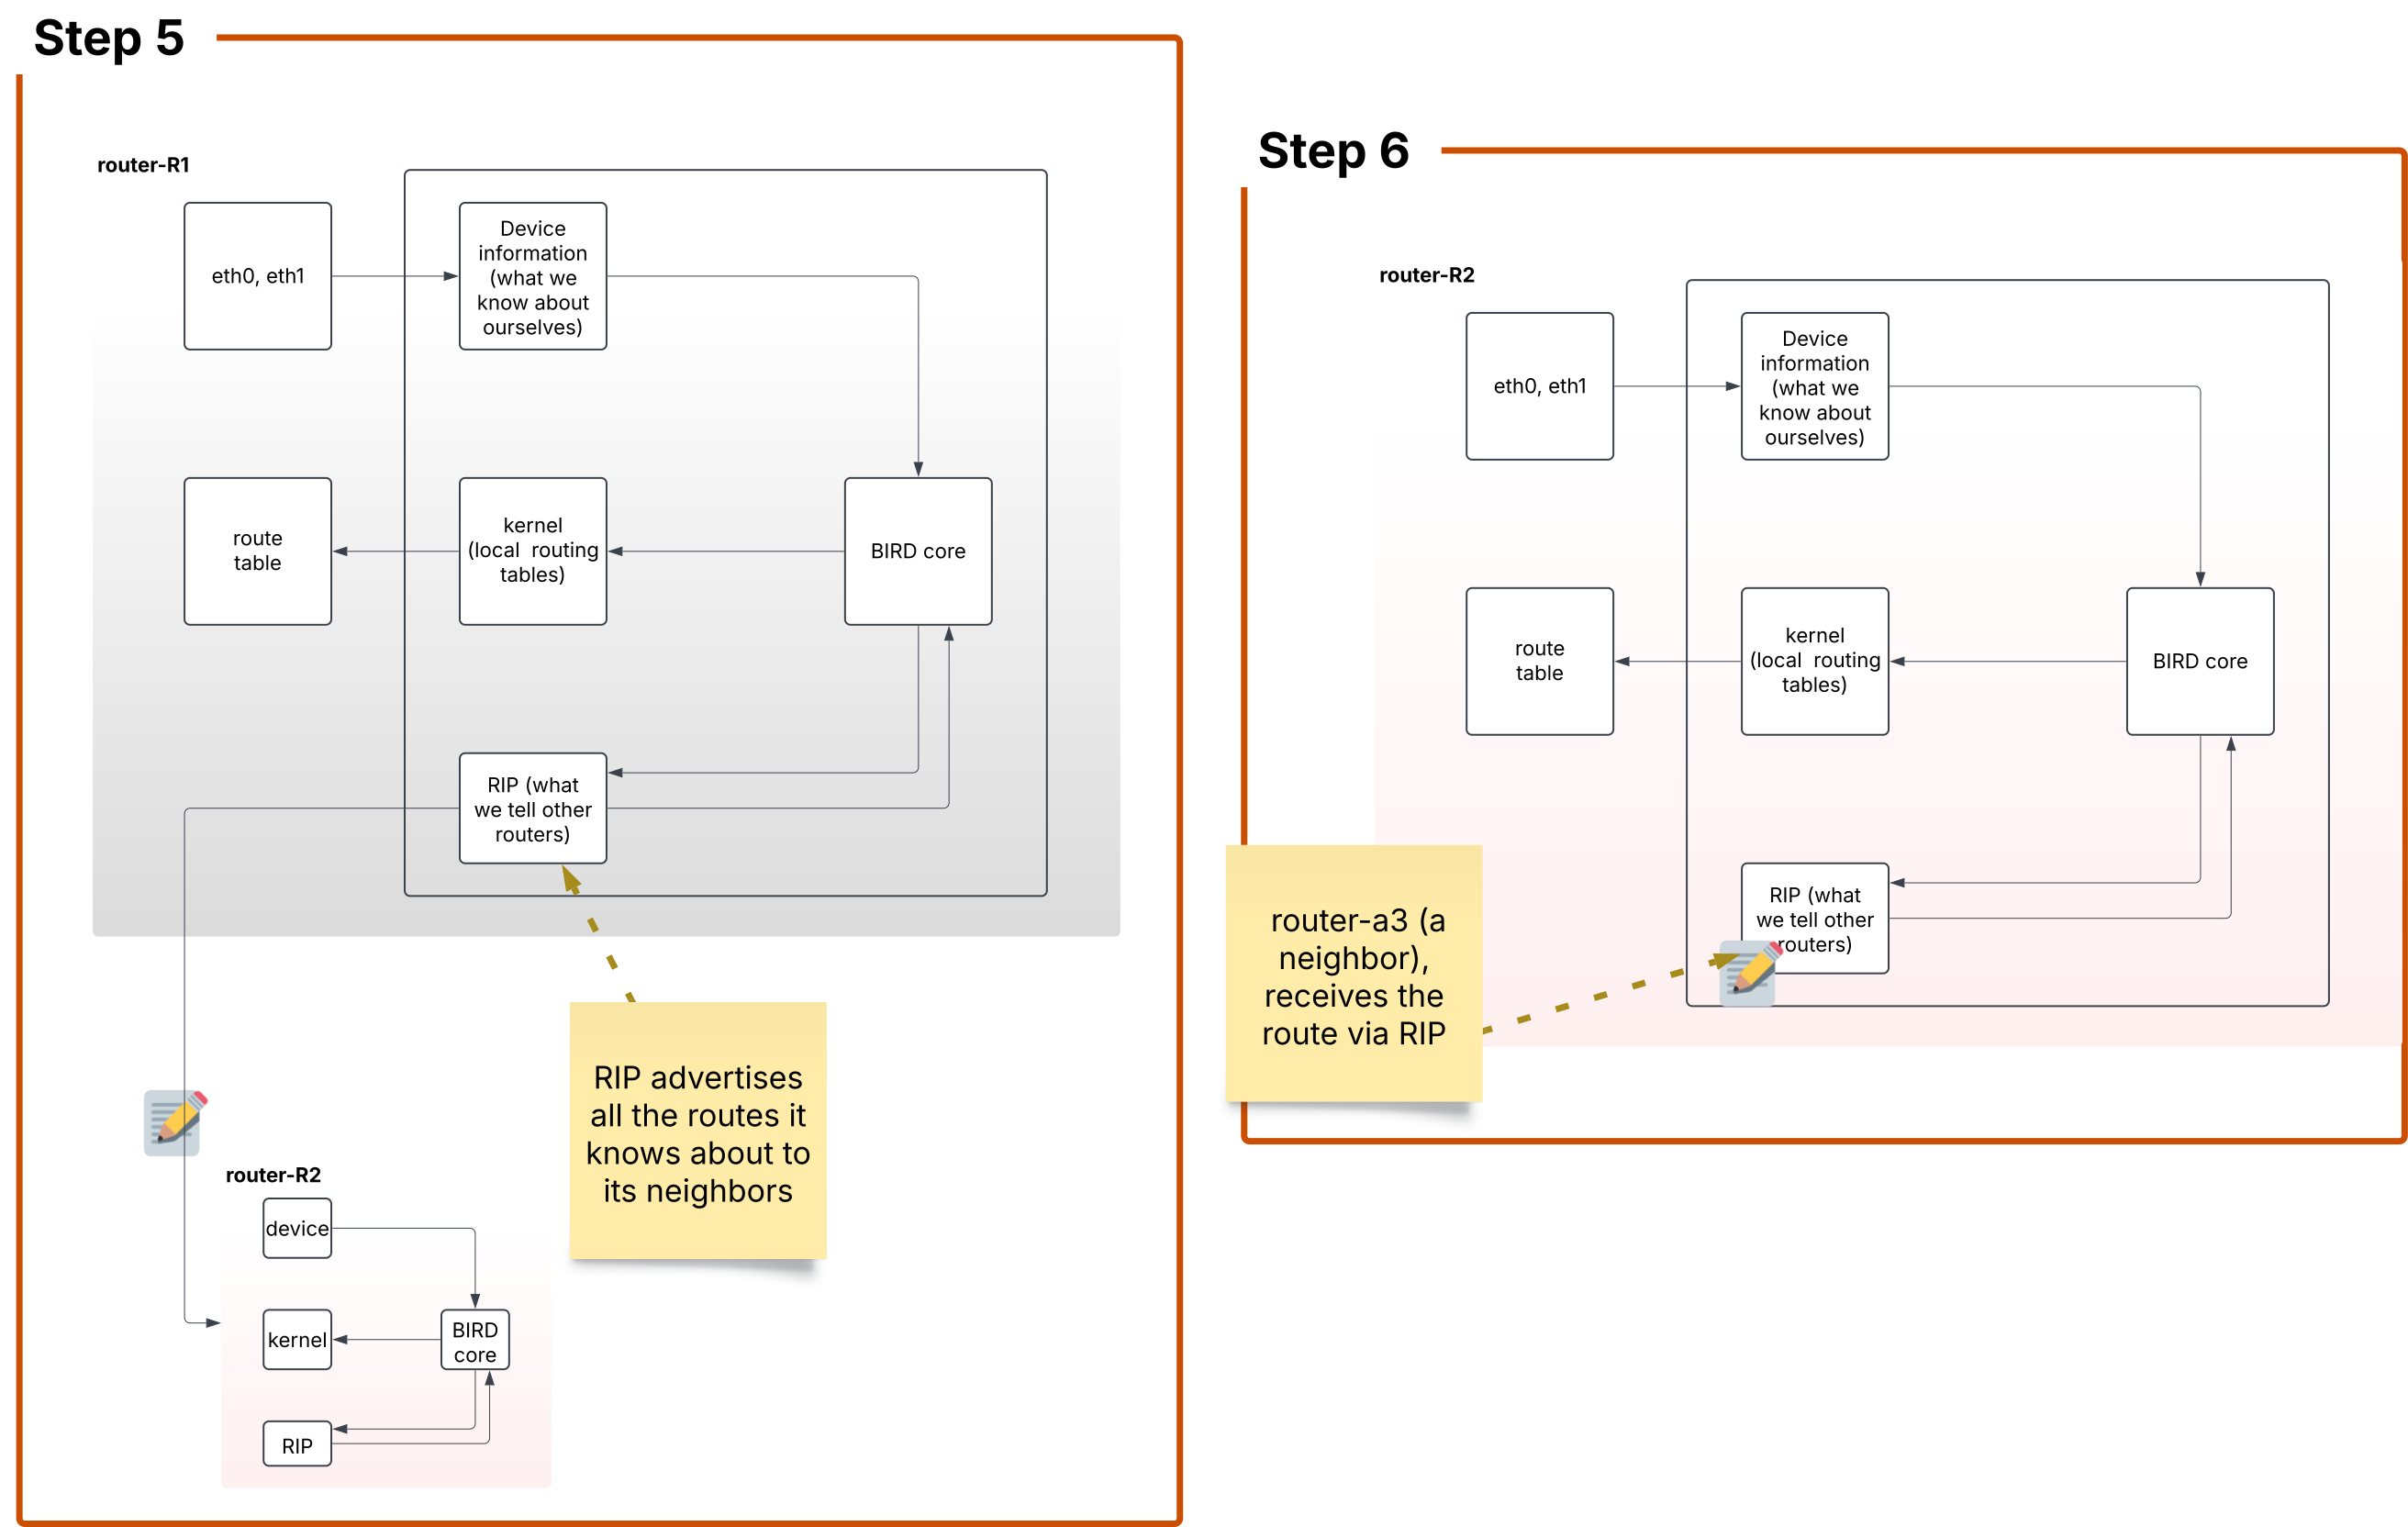
Step 5 Now it's time to transmit packets about routing information to other routers! BIRD will send RIP broadcast messages on every network it's connected to about every route that BIRD-core passed to it.
Step 6 Now we're looking at a neighbor router: router-R2! This router receives the routes from router-R1.
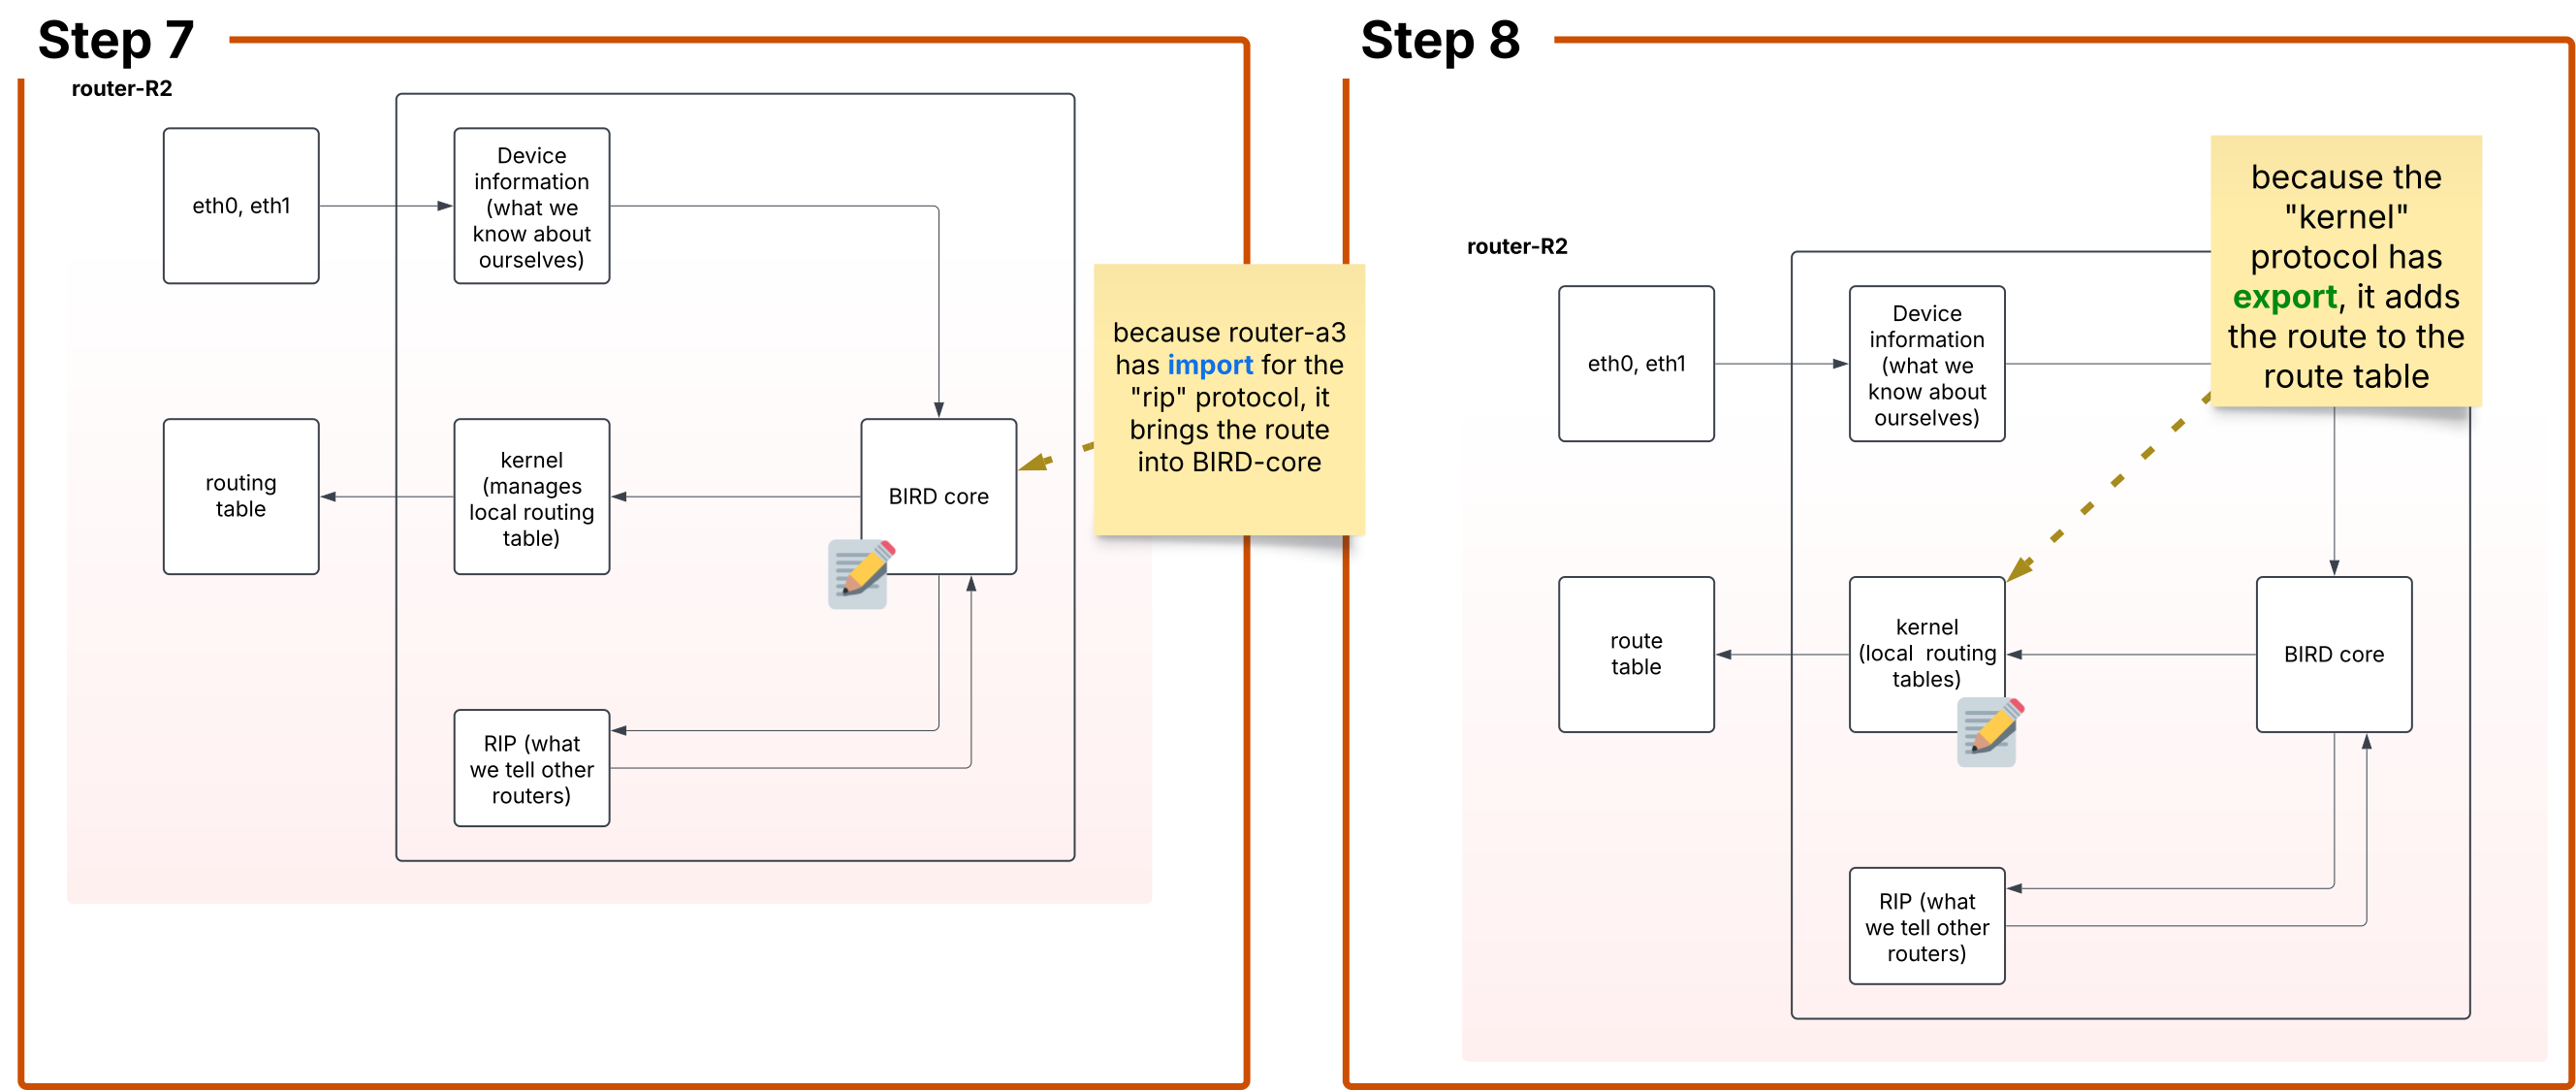
Step 7 BIRD-core on router-R2 now imports the routes from the RIP protocol in order to add them to BIRD-core's internal routing table. When routes are in BIRD-core's internal routing table, the router itself can't use those routes to make forwarding decisions yet because those routes haven't made it yet into the machine's route table.
Step 8 So now, BIRD-core communicates its routes to the kernel protocol which will write a copy of those routes to router-R2's routing table. router-R2 is now able to forward packets destined for networks connected to router-R1 towards router-R1.
Step 9 (not pictured) router-R2 communicates out all of its routes (including locally-connected routes as well as those it heard about from router-R1 to all of its locally-connected networks.
BIRD Configurations
We want to make sure you're comfortable with how BIRD is configured using RIP, so let's talk about the RIP config we used in this chapter section-by-section.
As we go through this configuration file, it might be helpful to reference the flowchart on how rip works section.
The first part of the config we'll look at deals with the network interfaces on the machine:
protocol device {
  scan time 10;
}

protocol direct {
  interface "*";
}
⚠️ Disclaimer: Typically when you hear the word "protocol", we are talking about standard methods for computer programs to exchange information over a network. In the context of BIRD configuration files, "protocol" indicates how information is received and managed by BIRD.
These two "protocols" work in conjunction. protocol device is used to gather information about what networks the router is connected to. And then, once BIRD knows about the routes, protocol direct instructs BIRD to inject those routes into bird's routing table. Only once these routes are in BIRD's routing table can they be communicated out to other routers using protocols like RIP.
Next, let's look at how routing information is imported and exported from the machine's routing table:
protocol kernel {
  import none;
  export all;
}
protocol kernel is used to influence the local routing table after receiving routing information from BIRD.
Because this configuration has export all, that means that all of BIRD's routes will be "exported" (written to) to the kernel. This is why, when you have BIRD running and you type ip route in your bash terminal on a router, you see routes imported by BIRD (e.g. 4.1.0.0/16 via 2.6.7.7 dev eth3 proto bird)
import none prevents routes that have been defined in the kernel (i.e. with the bash command ip route add) from propagating up to BIRD and thus out to other routers. Since we're not defining any routes in the kernel, this doesn't really have any effect.
EXERCISE: Try getting BIRD to advertise a route that you manually added using the
ip routecommand:
hopon router-a2- Edit up your
/etc/bird/bird.conffile and change theimport none;in thekernelconfiguration section toimport all;. - Add another line:
learn yes;immediately belowimport all; - Have BIRD re-read its configuration file with the command
birdc configure - in another window,
hopon router-a4and runwatch ip route - in your
router-a2window, runip route add 66.66.66.0/24 via 4.1.0.3 - See the route to
66.66.66.0show up onrouter-a4
Next, we're going to talk about how RIP itself gets configured:
protocol rip {
  import all;
  export all;
  interface "*" {
    version 2;
  };
}
protocol rip is responsible for setting up three things:
- Communicating to other routers the routes that this router knows
- Determining what routes this router is willing to learn from other routers
- Determine which interfaces we want to communicate with neighbor routers using the RIP protocol
That's it for RIP configuration in BIRD. We'll see many of these "protocols" used in future chapters. It's okay if you don't understand them now, but the more you play with them, the more sense it will make.
Deciphering terminal output from broken RIP route exercise
Destination Host Unreachable
When the routes are first broken, one of the messages you might see on client-c1 is this:
From 2.1.0.6 icmp_seq=1059 Destination Host Unreachable"Destination Host Unreachable" is an error message that shows up when an ARP request fails to resolve. If you need a refresher on how packets are forwarded from one machine to another on a network using ARP, refer to the appendix on IP and Ethernet Addresses.
2.1.0.6 is router-z6's interface on the network connecting Comcast to Zayo. We know that router-z6 wants to forward packets destined for AWS to router-z7 (i.e. 2.6.7.7). Since router-z6 has a cached ARP entry for router-z7, it will continue to forward packets in that direction. However, that cached ARP entry will eventually expire! When it does, router-z6 will send an ARP request to refresh the ethernet address for that router-z7. But, router-z7 is incapable of responding to those requests, router-z6 eventually gives up and sends an ICMP message back to client-c1 stating the machine it's trying to forward packets to is now offline, and so we see this "Host Unreachable" message.
Destination Net Unreachable
Another error we might see from client-c1 is:
From 1.1.0.3 icmp_seq=1203 Destination Net UnreachableDestination Net Unreachable indicates that some router on the path the packet is taking looks at the destination address and says, "I actually have no idea how to get to that network."
SO specifically, in this case, the router 1.1.0.3 (aka router-c3), has lost its entry for the destination IP (i.e. 4.1.0.13 in the case of the exercise where we break router-z7). Since it doesn't know the next hop to forward the packet to, it sends a message back to client-c1 indicating that there's a routing error.
Updates to router-z8's routing table
Eventually you'll see a message on router-z8 that it has learned a new path to reach the AWS network:
4.3.0.0/16 via 2.8.0.2 dev eth0 proto birdLooking at the new next-hop address, 2.8.0.2, we can see that router-z8 now wants to route packets through router-i2. While this route is less-efficient, our routing infrastructure is healed, and packets can once again travel from the Comcast network to the AWS network.