Basic Name Resolution
What is name resolution? What problem(s) does it solve? In previous chapters, we had to know the exact IP address of each machine's connection on each network to be able to ping. This became really tedious even with a network map in front of us to be able to see what the IP addresses should be. Wouldn't it be nice if we could reach machines over the internet using human-friendly names instead? That's where name resolution comes in! Name-resolution is the process of converting a human-friendly name into the IP address machines need to be able to route traffic across the Internet.
Goals for this section
Let's take a look at the internet we'll be working with for this chapter. You'll notice we've made some changes from the network diagrams we've used in other chapters. In this internet, we have a bunch of hosts that would like to communicate with each other:
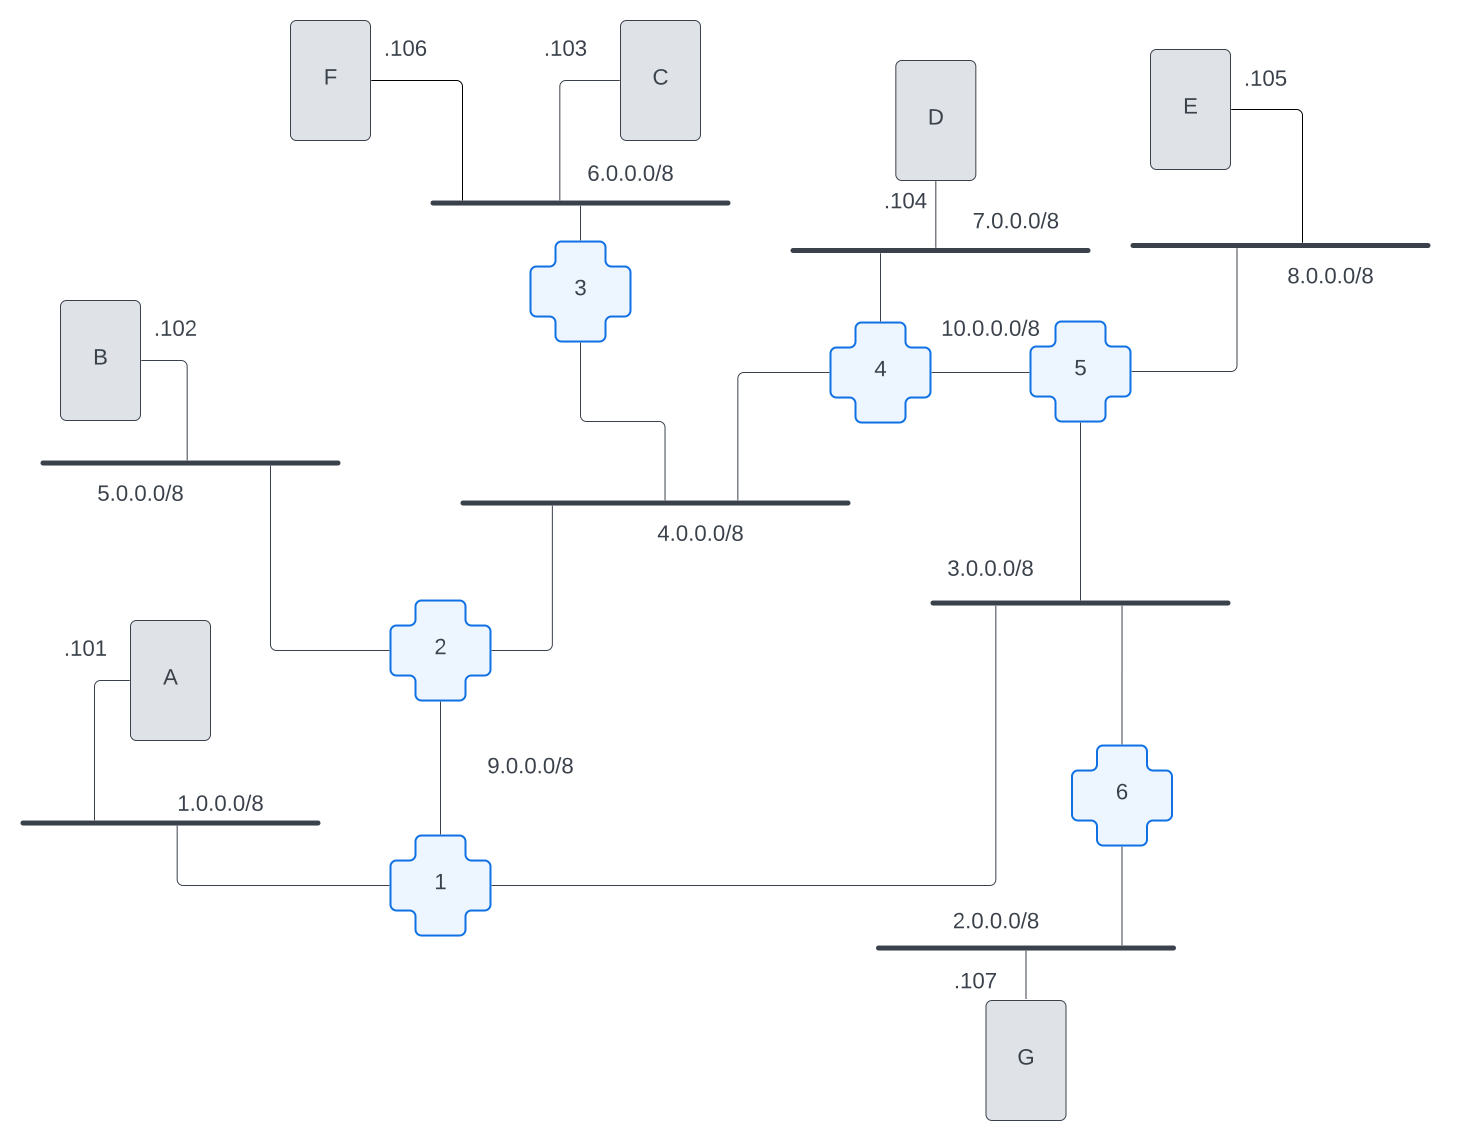
Let's say we set this internet up for sharing fun pictures. Perhaps your passion is dancing photos, and host A (1.0.0.101) contains a massive library of .jpg files of this genre. Perhaps your friend Squee's passion is adorable kitty pictures, and their host B (5.0.0.102) has photos of that kind. When all of our friends set up their image-sharing hosts, we're going to end up with a bunch of machines that contain specific files we want access to.
Here are some potential problems that could crop up on your new internet:
- How do we know which hosts have which files on it?
- How do we know when a new host with a new genre joins the group?
- What happens if a host moves to a new network?
Can you imagine how this might actually work in a real-life scenario? This is basically how the Internet started, and this is exactly the problem that people found themselves trying to figure out when stuff was all being made. What would you do to solve this problem in the simplest way that could possibly work?
Maybe you could just have central person who has the canonical list of all of your hosts in your friend-group and she mails everyone a new copy whenever it changes? But eventually, you're gonna get tired of this. Why?
- IP addresses are hard to remember and boring to type in
- Someone has to keep meta-data about what each IP address is for since they're not self-explanatory
- If/when a host changes its locations, it's nice not to have to re-discover the host
- You might want more than one host to support a big website: one on the east coast; one the west coast. How do you do that?
- If you referencing web-pages only by IP address (e.g.
http://<ip-address>), you can only have one web-page per host. What happens if you want more than one website on a host? - If this scales to a really large number of hosts, even the most dedicated friend is going to quit in frustration
- In the end, this is just busy-work that a human is going to get tired of doing. Maybe a computer should do this instead?
When we have this many hosts, we need a convenient way to tell them apart and know which resources you'll retrieve from each one. Our goal here is to implement a system to convert a human-readable easy-to-understand name into an IP address.
Preamble
Before we get started, we made some configuration changes to the hosts on this internet that we haven't seen yet in other chapters. Docker, by default has a name resolution server that we don't want to use or accidentally get involved as we're exploring implementing our own name resolution solutions. We therefore made a couple configuration changes to /etc/resolv.conf which nerfs Docker's ability to perform name resolution on our behalf. We'll talk more about these files in later chapters.
Let's do some computers
Okay, we have a brand-new docker-compose.yml file and Dockerfile for you. This will build out the network that we showed above. Let's start by testing out that this internet works as expected.
Use the byoi-rebuild command to start everything up, and use the hopon command to get into host-a and ping host-c (which is at 6.0.0.103):
$ hopon host-a
root@host-a:/# ping 6.0.0.103 -c 2
PING 6.0.0.103 (6.0.0.103) 56(84) bytes of data.
64 bytes from 6.0.0.103: icmp_seq=1 ttl=61 time=0.416 ms
64 bytes from 6.0.0.103: icmp_seq=2 ttl=61 time=0.231 ms

--- 6.0.0.103 ping statistics ---
2 packets transmitted, 2 received, 0% packet loss, time 1062ms
rtt min/avg/max/mdev = 0.231/0.323/0.416/0.092 ms
Note that at this point none of the hosts on our network know the names of any of the other hosts on the network, so we need to refer to them with IP addresses only. In other words, pinging host-c will not work yet!
root@host-a:/# ping host-c -c 2 -w 1
ping: host-c: Name or service not known
How does your computer know where to go to resolve a name?
Let's start with the command ping host-c... what happens? Your computer needs to figure out where to send the ICMP ping packets, which means turning host-c into an IP address. It will start by referencing a configuration file, /etc/nsswitch.conf. On the host you're currently looking at, go ahead and cat /etc/nsswitch.conf to look at its contents. It should contain a line related to hosts:
hosts: files dnsWhat we see here is the sequence, from left to right, that will be followed in resolving each and every name the host needs to look up. As soon as the resolution process finds an entry, we have successfully converted the name into an IP address and we don't need to keep looking.
What do these mean though?
files: Is there an entry for this hostname in a local file? In UNIX based systems that file would be/etc/hosts.dns: We gotta outsource this request to the larger internet; check the/etc/resolv.conffile for where we should send our DNS queries.
/etc/hosts files
/etc/hosts is a file used by the unix-family of machines for hard-coded name-resolution. It allows technically-savvy people to force name-resolution to a specific IP address.
📝 NOTE: if you're using a Windows machine (non-unix) you'll need to google for the exact location of this file.
Let's take a look at how this works.
On the host-a machine, open the file with nano /etc/hosts. You'll see a bunch of names already defined:
127.0.0.1       localhost
::1     localhost ip6-localhost ip6-loopback
fe00::0 ip6-localnet
ff00::0 ip6-mcastprefix
ff02::1 ip6-allnodes
ff02::2 ip6-allrouters
1.0.0.101       host-a
The format of this file is to have an IP address starting each line, one or more blank spaces, and one or more human-readable names separated by blank space(s).
Let's add a new name! At the end of this list, add the following line and save the file:
6.0.0.103 host-c
NOW if you ping host-c, you'll get some feedback!
root@host-a:/# ping host-c -c2 -w1
PING host-c (6.0.0.103) 56(84) bytes of data.
64 bytes from host-c (6.0.0.103): icmp_seq=1 ttl=61 time=0.426 ms

--- host-c ping statistics ---
1 packets transmitted, 1 received, 0% packet loss, time 0ms
rtt min/avg/max/mdev = 0.426/0.426/0.426/0.000 ms
Name resolved! ✅
Let's make it easier for ourselves by cheating
While that was exciting, the thought of manually editing host files seems to suck all the air out of the room. Well, we can cheat a little bit. Docker allows us to define what it calls extra_hosts that will get added to /etc/hosts. So, let's update host-a's definition in our docker-compose file to add the necessary hosts.
  host-a:
    container_name: "build-your-own-internet-host-a"
    build: .
    image: "build-your-own-internet-host"
    hostname: host-a
    networks:
      one-net:
        ipv4_address: 1.0.0.101
    cap_add:
      - NET_ADMIN
    sysctls:
      - net.ipv4.ip_forward=0
    extra_hosts:
      host-b: 5.0.0.102
      host-c: 6.0.0.103
      host-d: 7.0.0.104
      host-e: 8.0.0.105
      host-f: 6.0.0.106
      host-g: 2.0.0.107
A quick byoi-rebuild and we can hopon host-a and travel to all the other hosts!
Test your work with ping
root@host-a:/# ping host-b -c2 -w1
PING host-b (5.0.0.102) 56(84) bytes of data.
64 bytes from host-b (5.0.0.102): icmp_seq=1 ttl=62 time=0.148 ms

--- host-b ping statistics ---
1 packets transmitted, 1 received, 0% packet loss, time 0ms
rtt min/avg/max/mdev = 0.148/0.148/0.148/0.000 ms
root@host-a:/# ping host-c -c2 -w1
PING host-c (6.0.0.103) 56(84) bytes of data.
64 bytes from host-c (6.0.0.103): icmp_seq=1 ttl=61 time=0.154 ms
--- host-c ping statistics ---
1 packets transmitted, 1 received, 0% packet loss, time 0ms
rtt min/avg/max/mdev = 0.154/0.154/0.154/0.000 msFeel free to ping the rest of the machines (host-d through host-g) to confirm that your names are resolving properly.
Now that we have host-a working properly, it's up to you to update the rest of the entries for hosts to add the necessary extra_hosts fields. If you would like to see a properly configured final version of this file, we have left one for you here ./final/docker-compose.yml.
Test your work with links
Working with ping is cool and all, but that's not what makes the Internet the international phenomena that it is today. We want to see those pictures that we referenced earlier. Fortunately, we've already set up a simple http server on each of our hosts and loaded some pictures on them.
Let's use links to explore our internet and see what's available to look at!
Let's hopon host-a and check out what's available locally to start:
root@host-a:/# links http://host-aAs soon as you run this command, you'll see the full-screen text-based web-browsing majesty that is links:
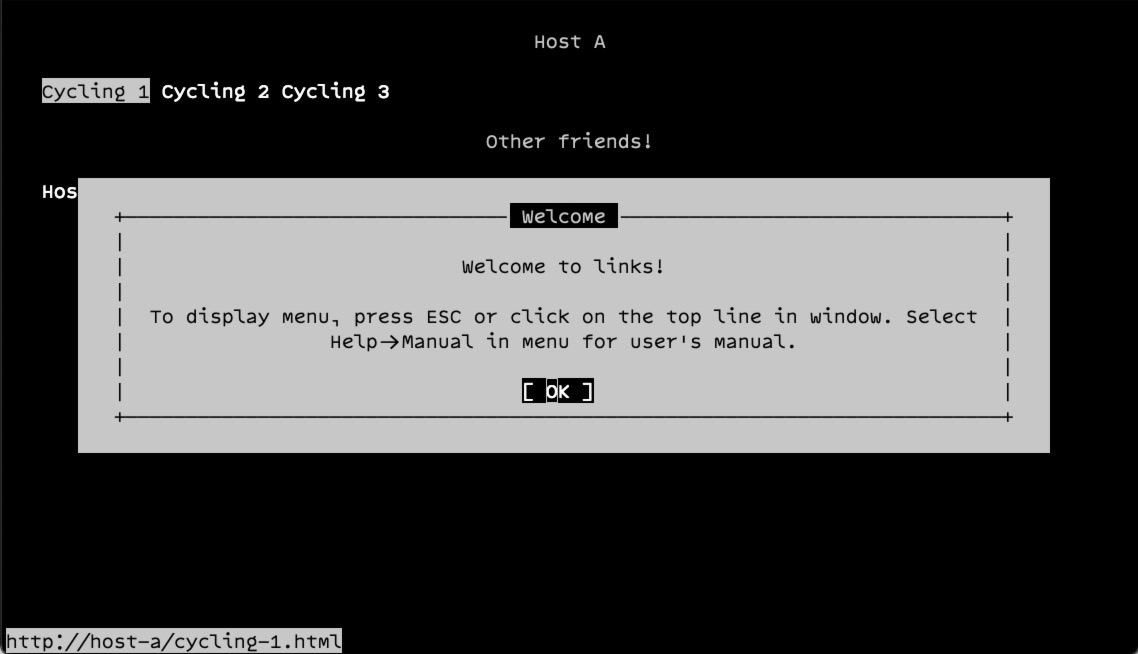
Press <enter> on your keyboard to dismiss the welcome message. This is a text-based app to browse web-pages. It uses arrow-keys and tabs and enter and backspace in relatively intuitive way. Feel free to browse the documentation for it if you get stuck. Enjoy the amazing images! Also, notice that you can follow hyperlinks to all the other servers in this internet and explore the images on those systems as well!