First network
What needs to happen for two machines to communicate? First, the machines need some medium to transmit their messages over. This will usually be a cable or wire. Think about the cable connected to your modem. That cable runs between your house and some entrypoint into your Internet Service Provider. Once the cable is set up, the machines will then need to know how to send messages to each other. When two or more machines can communicate directly with each other, they are on what we call a 'network'.
Goals for this section
We want to build a simple network where two machines can communicate with each other. We'll start by setting up these two machines with a wire connecting them, but they don't know how to talk to each other yet. Next, we'll teach them how they can communicate across that wire! This will establish our network for these two machines!
Speaking in networking jargon, what you're going to learn how to do is be a "Network Administrator™" on a simple local-area network. This jargon boils down to: "can you get two or more machines on a single network to talk to each other?" With that in mind, let's get administrating!
Understanding the Network
We want to introduce a diagram of what this network will look like by the end of this chapter. Here's what we expect our network to look like by the end of this chapter:
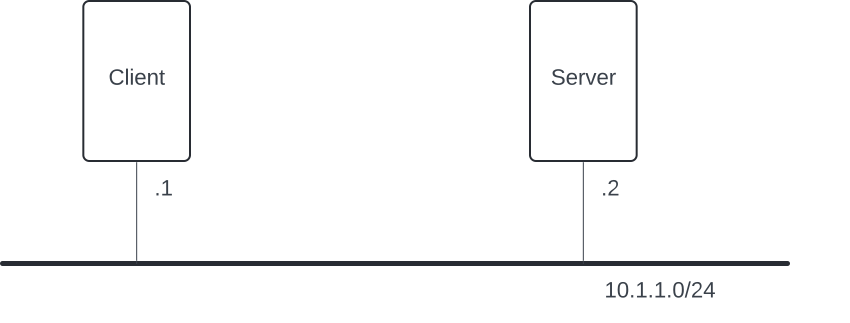
You may have never seen a network diagram before. That's cool, we gotchu!
In this diagram, there are 2 machines, client and server. These machines are on a single network, 10.1.1.0/24. What do those numbers mean? If you've ever seen an IP address before, the beginning of that block might look a little familiar. This is what's called a "network address." To understand more about network addresses, check out the appendix entry on Prefixes and Subnet Masks. For the purposes of this chapter, it will suffice to understand that this network can have a number of machines on it, but each machine must have an IP address in the range from 10.1.1.0 through 10.1.1.254. Looking at that diagram, we see that there's a .1 noted next to the client machine. This indicates that client has the IP address 10.1.1.1. Similarly, server has a .2 next to it in the image, therefore, server has the IP address 10.1.1.2.
Build a Network
To start with, we'll need to get our client and server machines up and running. You could go out and buy hundreds of dollars of computer hardware if you want, but... we're a fan of doing this on the cheap. Instead, for each of these chapters, we'll be building our toy internets using virtual machines. So, we'll need to boot up a set of virtual machines and then connect them together with virtual wires. Fortunately, we created a script that will boot any and all machines you need for each chapter and attach the virtual cables between them. To get started, in the chapter's directory, simply run byoi-rebuild in your terminal:

Check the current state
Now that we've got some machines up and running, let's network them together! To start with, let's just verify that client and server can't already talk to each other. We can check this by running a very simple program called ping.
Think of ping the way you might "ping" a friend in real life. It's just a text that says, "Hey! 👋" — and your friend would likely respond with something like, "What's up?". That's it! It's just two machines saying hello to each other. Much like your text-message ping, we have to give it an address. For the ping command, we'll give it the IP address of the other computer.
To try this out, we need to get terminal sessions running on both client and server machines.
Starting machines and connecting to them
When you start a virtual machine, like client and server in this chapter, it’s like booting up another computer inside your computer. To access it, you usually open a terminal (command line) and connect to that virtual computer. When you do this, your terminal session switches — you’re no longer typing commands on your real computer. Instead, you’re typing commands inside the virtual machine. The commands you type there will not impact your real computer.
The way you can connect to the virtual machines for each of these chapters is the hopon command. E.G.: hopon client. hopon is a Build Your Own Internet command that we wrote to make it easy for you participate in these chapters. Running this command will result in opening an interactive terminal session on the client virtual machine.
So now, use two windows in your terminal and hopon client in one session, and hopon server in the other. In the client session, run your ping command to server using its IP address, 10.1.1.2:
$ hopon client
root@client:/# ping 10.1.1.2
ping: connect: Network is unreachable
Perfect! we were expecting ping to fail. Fortunately, we get an error message that tells us what's happening: Network is unreachable. This means that client doesn't know how to send messages to the network (e.g. 10.1.1.0/24) that the ping is attempting to reach. We need to configure each machine's IP address and network.
We can see the IP addresses and networks that a computer is attached to by running the ip address command (ip addr for short):
root@client:/# ip addr
1: lo:  mtu 65536 qdisc noqueue state UNKNOWN group default qlen 1000
    link/loopback 00:00:00:00:00:00 brd 00:00:00:00:00:00
    inet 127.0.0.1/8 scope host lo
       valid_lft forever preferred_lft forever
11: eth0@if12:  mtu 1500 qdisc noqueue state UP group default
    link/ether 02:42:ac:12:00:02 brd ff:ff:ff:ff:ff:ff link-netnsid 0
There's a lot going on here, and we'll get more familiar with this output in future chapters. But, for now, what we're seeing is two network interfaces on client: one for "loopback", lo, which is used when a computer wants to send messages to itself. The other interface, eth0 shows us that client has an Ethernet interface with no IP address attached to it.
Add our own IP address configuration
Let's add IP addresses to each of these machines using the ip addr add command. In this exercise, we want to use the 10.1.1.0/24 network. Therefore on client, we use the command:
root@client:/# ip addr add 10.1.1.1/24 dev eth0You'll want to repeat this process on server, but instead use the ip address 10.1.1.2/24.
Test the network connection
Next, we're going to start exploring with a networking tool called tcpdump. When computers are sending messages back and forth to each other, tcpdump gives us a way to inspect those messages as they pass to and from the network.
What we'll end up running on server is:
root@server:/# tcpdumpThe initial output of this command should be:
tcpdump: listening on eth0, link-type EN10MB (Ethernet), snapshot length 262144 bytesThis command will now sit and run, waiting for network traffic to come in over the eth0 interface. Once it sees traffic, it will print to the terminal what it's seeing on the network. You may not see anything else until you run the ping from client.
Now it's time to verify that the two machines can reach each other, so let's use the ping command. On client, run:
root@client:/# ping -c 5 10.1.1.2and you should see on client:
PING 10.1.1.2 (10.1.1.2) 56(84) bytes of data.
64 bytes from 10.1.1.2: icmp_seq=1 ttl=64 time=0.341 ms
64 bytes from 10.1.1.2: icmp_seq=2 ttl=64 time=0.223 ms
64 bytes from 10.1.1.2: icmp_seq=3 ttl=64 time=0.240 ms
64 bytes from 10.1.1.2: icmp_seq=4 ttl=64 time=0.091 ms
64 bytes from 10.1.1.2: icmp_seq=5 ttl=64 time=0.199 ms

--- 10.1.1.2 ping statistics ---
5 packets transmitted, 5 received, 0% packet loss, time 4096ms
rtt min/avg/max/mdev = 0.091/0.218/0.341/0.080 ms
And, you should see some variation on the following on server (the packets may be in a different order, so you may see the ARP requests later in the dump):
19:52:30.295932 ARP, Request who-has 10.1.1.2 tell 10.1.1.1, length 28
19:52:30.296116 ARP, Request who-has 10.1.1.1 tell 10.1.1.2, length 28
19:52:30.297091 ARP, Reply 10.1.1.1 is-at 02:42:ac:16:00:02, length 28
19:52:30.297112 ARP, Reply 10.1.1.2 is-at 02:42:ac:16:00:03, length 28
19:52:24.811978 IP 10.1.1.1 > 10.1.1.2: ICMP echo request, id 5, seq 1, length 64
19:52:24.812031 IP 10.1.1.2 > 10.1.1.1: ICMP echo reply, id 5, seq 1, length 64
19:52:25.820736 IP 10.1.1.1 > 10.1.1.2: ICMP echo request, id 5, seq 2, length 64
19:52:25.820799 IP 10.1.1.2 > 10.1.1.1: ICMP echo reply, id 5, seq 2, length 64
19:52:26.826028 IP 10.1.1.1 > 10.1.1.2: ICMP echo request, id 5, seq 3, length 64
19:52:26.826081 IP 10.1.1.2 > 10.1.1.1: ICMP echo reply, id 5, seq 3, length 64
19:52:27.865467 IP 10.1.1.1 > 10.1.1.2: ICMP echo request, id 5, seq 4, length 64
19:52:27.865502 IP 10.1.1.2 > 10.1.1.1: ICMP echo reply, id 5, seq 4, length 64
19:52:28.887895 IP 10.1.1.1 > 10.1.1.2: ICMP echo request, id 5, seq 5, length 64
19:52:28.887926 IP 10.1.1.2 > 10.1.1.1: ICMP echo reply, id 5, seq 5, length 64
Understanding tcpdump and ping output
ping starts by sending an "Echo Request" message to the destination machine. If the sending machine receives a response ("Echo reply") back, then we see a line of output from the ping command which gives some useful information about that interaction. That output will look something like what we saw above, for example:
64 bytes from 10.1.1.2: icmp_seq=3 ttl=64 time=0.240 msThe icmp_seq designation marks each individual request/response pair. time tells us exactly how much time elapsed between sending and receiving the response (in this case, less than a millisecond). The ttl value is something that gets involved when we start investigating large networks which we will come back to in a future chapter.
If the ping did not go through, you might see various error messages, but the most common is that the ping command errors out with Request timeout for icmp_seq 0 type messages.
On the other side of the connection, server's tcpdump has much more going on! First, we see a series of messages that have ARP in them:
19:52:30.295932 ARP, Request who-has 10.1.1.2 tell 10.1.1.1, length 28
19:52:30.296116 ARP, Request who-has 10.1.1.1 tell 10.1.1.2, length 28
19:52:30.297091 ARP, Reply 10.1.1.1 is-at 02:42:ac:16:00:02, length 28
19:52:30.297112 ARP, Reply 10.1.1.2 is-at 02:42:ac:16:00:03, length 28
ARP, which stands for Address Resolution Protocol, allows two machines on the same network to know where to send messages to each other. ARP is a way for a computer to find the physical location of another device on the same network when it only knows its IP address. It does this sending by a message to every machine on the network, and asking “Who has this IP?”. Then, if there is a device with that address, the machine that owns that IP address replies with its location. Without ARP, devices couldn’t actually deliver data to each other on a local network even if they knew each other’s IP addresses.
To learn more about ARP, check out the prefixes and subnet masks appendix.
After seeing the ARP packets go back and forth, we next see the ICMP echo request and echo reply packets go back and forth in our tcpdump output:
19:52:24.811978 IP 10.1.1.2 > 10.1.1.1: ICMP echo request, id 5, seq 1, length 64
19:52:24.812031 IP 10.1.1.1 > 10.1.1.2: ICMP echo reply, id 5, seq 1, length 64
Summary so far
We did it! We got two machines to talk to each other! You've done your first task as a Network Administrator and set up a single local-area network! Here are the basic concepts we learned:
- What IP addresses and network addresses are used for
- How to configure IP addressing for two machines on the same local-area network
- How
pingworks - How to use
tcpdump - What ARP does
At this point, if you had two machines at home with an ethernet cable connecting them, you should be able to use these tools to get them to establish basic network communications with each other.
Exercises
Now that you know how this works, let's struggle through some similar activities and see if you can interpret what is happening in each case. We'll walk through the answers in the next section.
Ping 10.1.1.12 from the client machine
You might want to refresh yourself with the network map real quick before doing these exercises. We're going to start by attempting to ping a new IP address, 10.1.1.12, from the client machine. Do you expect that this will work? Why or why not?
In the window that you have open on the client machine, run the following command and test your answer:
root@client:/# ping -c 5 10.1.1.12What do you see in the output from this command? What do you think this output means?
🚨 JARGON ALERT: You may not have come across the word "host" before. If that's the case, "host" is just a synonym for "another machine".
Now take a look at the window that you still have open on the server machine. What do you see in the output from the tcpdump command after you ran that ping from client?
Take a moment and think about what might be happening there. It's okay if you don't understand yet!
Add 10.1.1.12 to the server machine
In the previous exercise, we saw a message: From 10.1.1.1 icmp_seq=1 Destination Host Unreachable. This indicated that our ping failed because our client machine couldn't find another machine that would respond to that IP address.
Now let's go ahead and add the IP address that was failing in the previous exercise to the server machine. Leave your tcpdump session on server running and open a new window. In the new window, hopon server and issue the following command:
root@server:/# ip addr add 10.1.1.12/24 dev eth0Try the ping command again from the client machine. Does it work now? Why or why not? On the tcpdump output from the server machine, did you notice anything different? Specifically, you might try paying attention to those weird ARP messages. What was different about them this time?
Understanding ARP messages
Before we added the 10.1.1.12 address to server, you probably saw some messages like this in your tcpdump output:
19:17:32.755567 ARP, Request who-has 10.1.1.12 tell 10.1.1.1, length 28
19:17:33.756936 ARP, Request who-has 10.1.1.12 tell 10.1.1.1, length 28
19:17:34.784211 ARP, Request who-has 10.1.1.12 tell 10.1.1.1, length 28
19:17:35.808529 ARP, Request who-has 10.1.1.12 tell 10.1.1.1, length 28
19:17:36.830046 ARP, Request who-has 10.1.1.12 tell 10.1.1.1, length 28
19:17:37.856908 ARP, Request who-has 10.1.1.12 tell 10.1.1.1, length 28
Remember when we introduced how ARP works? It's used to find a machine that owns an IP address by sending out messages to every machine connected to the network. This is called "broadcasting." Think of a room full of people. Whenever anyone in that room shouts, everyone else in the room can hear them. But someone standing in another room isn't able to hear those shouts. Networks function in the same way: machines can shout (or "broadcast") to one another, but any machine on a different network will never hear those shouts. Technically, a "network" is defined by all the machines that can receive a broadcast message.
Now let's look back at that tcpdump output again. What we're seeing is an incoming (broadcast) ARP request asking, "Who is 10.1.1.12"? There are two observations we can make:
- there are repeated requests for this address, so we can assume that nobody is responding to the message
- since we happened to set this network up ourselves and we know all the machines connected to it, we know that there are no machines with that IP address.
Once we add the IP address to server, we get a different story:
19:18:19.477837 ARP, Request who-has 10.1.1.12 tell 10.1.1.1, length 28
19:18:19.477853 ARP, Reply 10.1.1.12 is-at 02:42:ac:12:00:03, length 28
19:18:19.477929 IP 10.1.1.1 > 10.1.1.12: ICMP echo request, id 6, seq 1, length 64
19:18:19.477957 IP 10.1.1.12 > 10.1.1.1: ICMP echo reply, id 6, seq 1, length 64
Notice that this ARP request now has a matching reply that says there is a machine with the 10.1.1.12 IP address.
Pinging 100.100.100.100 from client
On the surface, this might look the same as the first exercise. But, if you recall from Understanding the network, we said that valid IP addresses for the network we just built are from 10.1.1.0 through 10.1.1.254. Now you're going to be pinging an IP address that is outside this range and so you're going to get a different error message:
root@client:/# ping -c 5 100.100.100.100
ping: connect: Network is unreachable
The error message here is Network is unreachable. Since our machines only know about the 10.1.1.0/24 network, ping doesn't even attempt to send a message to this address. You may notice, in fact, that the output of tcpdump on the server machine does not include any ARP messages.
You could try adding that ip address to the server machine (e.g. ip addr add 100.100.100.100/24 dev eth0), but the ping messages will never be successful.
Why is that? We'll get into that in the next chapter!